If you want to navigate the Ethereum ecosystem, you should know that technical things like nodes, consensus algorithms, and staking limits are all important. And while Ethereum is a complex labyrinth on its own, it requires a specialized client to interact with. Geth is one of those clients. Also, like any other blockchain, Ethereum is secured by nodes — specialized computers running the Ethereum clients to validate transactions and secure the network. And this is where the concept of Geth node surfaces — a node or a specialized computer running the Geth client.
Ethereum clients and nodes work together to keep the network alive and functioning. Here, we focus on installing and running a Geth node, explaining the nuances of the process. If you follow this guide, you should be able to play around with a Geth node, using it to interact with the Ethereum blockchain.
- Unpacking Geth: what’s it about?
- What are the requirements for the Geth node?
- What should you know before trying to install and run Geth?
- Installing Geth on different platforms
- Running the Geth node
- Becoming a validator using the Geth client
- Various command line utilities offered by the Geth
- How to set up a private blockchain using Geth?
- Is it worth setting up a Geth node?
- Frequently asked questions
Unpacking Geth: what’s it about?
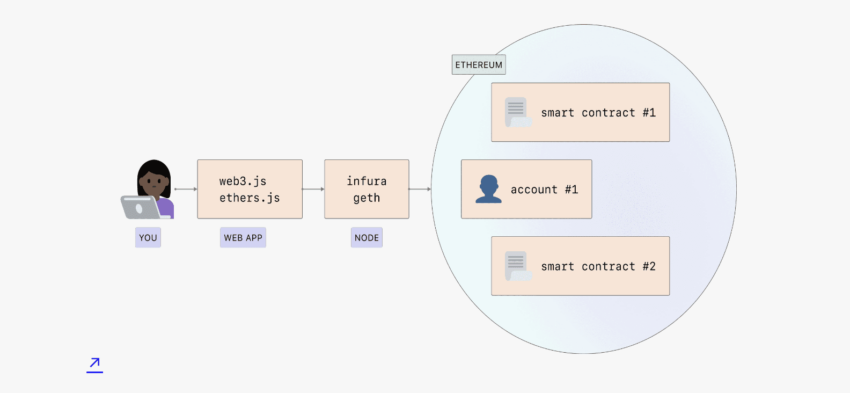
To understand Geth and a Geth node better, let us break Ethereum down. Imagine Ethereum as a supercomputer. However, for that supercomputer to work, several smaller computers need to add to its computing power, relay information to it, and support it in a number of ways. A Geth node is one such smaller computer.
Also, the Ethereum network comprises the consensus layer (CL) and the execution layer (EL). While the consensus layer (CL) validates blocks and manages the consensus algorithm, the execution layer is meant for smart contract execution and processing transactions. Before the transition, both these functions were bundled as one.
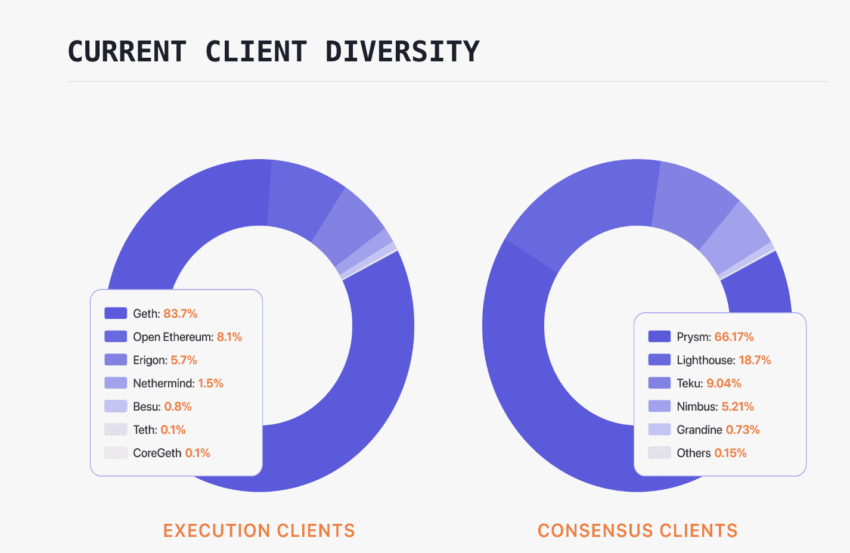
Geth falls in the category of execution clients. In the current state of things, there exist EL-CL combos to handle the Ethereum Protocol’s workload.
Execution layer diversity has also picked up over the past 12 months:
What is Geth?
Geth signifies Go Ethereum. You can think of it as a software application that connects your computer to the Ethereum ecosystem. Another way of looking at it is a communication program, allowing your PC to speak Ethereum’s language. With a Geth node, you can verify transactions, deploy and run smart contracts, create blocks, and interact with Ethereum in its entirety.

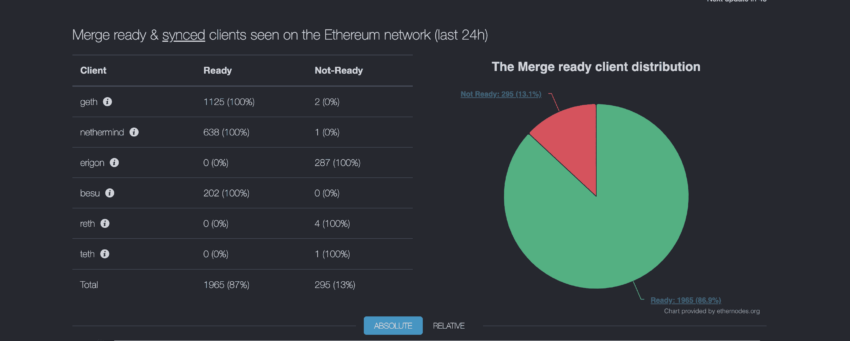
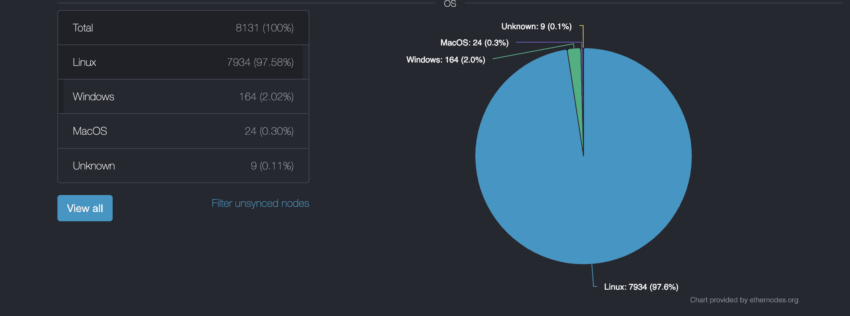
Geth, the software application, is written in the Go Programming language with the Ethereum Foundation maintaining it. It is also a command line interface that makes it possible for compatible PCs to act as an Ethereum node. And while Geth came into existence long before Ethereum turned PoS, most of Geth nodes are now merge-ready and synced per the PoS standards.
Geth client and the security standards:
Why install and run a Geth node?
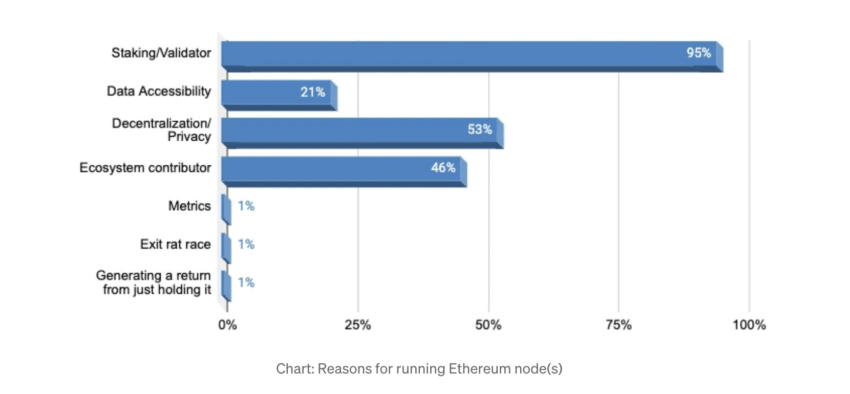
There are a number of reasons you might want to install and run a Geth node. As a developer, having a Geth node allows you to create and even test decentralized applications.
Stakers who wish to be validators can use the Geth node to stake ETH, earn rewards, and propose new blocks.
What are the requirements for the Geth node?
Installing and running a Geth node are hardware-specific processes. The following processes justify the technical load associated with Geth nodes:
- Verifying and furthering transactions
- Running the Ethereum Virtual Machine (EVM)
- Storing the blockchain
- Syncing with the network
And all of that puts the stress on three specific PC components:
- A powerful CPU, precisely to run multiple tasks like processing transactions, running the EVM, and more, simultaneously. A multi-core CPU is, therefore, necessary.
- A sizable chunk of RAM is meant to handle large blockchain data sets relevant to the Ethereum protocol. Also, additional RAM helps with blockchain data caching for quicker access. Anything in excess of 7GB is a good threshold for running a Geth node.
- A large SSD module, as the Ethereum ecosystem is constantly spreading out. Storing the entire blockchain or its parts requires a lot of space. An SSD is a better bet as it helps the nodes access data faster. Free storage space of over 600GB is preferred for a Geth Ethereum node.
Did you know? Ethereum’s data structure or the way of storing data on-chain is termed the Merkle Patricia Tree. It combines Merkle Trees, coined after Ralph Merkle, and Patricia Trees, named after the “Practical Algorithm to Retrieve Information Coded in Alphanumeric” trees.
What should you know before trying to install and run Geth?
Before we delve deeper into the installation and running of a Geth node, we need to understand a bit about the Ethereum nets — mainnet and testnets included.
The reason we need to focus on the mainnet and testnets is that the Geth client can be used to connect to either, depending on preferences. A Geth node can interact with the mainnet and the testnets. If you are a developer, you might want to connect the blockchain node to the testnet, as that way, it becomes easier to test the DApps before mainnet deployment.
However, if you plan to run an Ethereum-based service, like a wallet or even an exchange, you will require a mainnet network connectivity. This way, your service can process real transactions. Do note that testnets have a smaller transaction history than the mainnet.
Mainnet and testnets explained.
Here is a quick overview of the Ethereum nets, explained for your reference:
Mainnet
It is the live and production-ready version of Ethereum. It aids the production of ETH, and interacting with the same attracts what we call the gas fee.
Testnets
For simply testing DApps and other functions without having to pay actual ETH, you can consider the following testnets.
Ropsten
One of the more popular testnets uses a different chain ID than Ethereum. This testnet has been a developer favorite due to its stability and compatibility with diverse smart contracts and DApps.
Kovan
Kovan is another popular testnet, but it is only meant for the Parity nodes. Do note that, like Geth, there are other clients like Nethermind, OpenEthereum or Parity, Erigon, and Hyperledger Besu.
Rinkeby
This testnet uses proof-of-authority (PoA) and lets you access free test ETH to test out features and resources. To use Rinkeby, you need to use your Ethereum address to establish authority by linking the same to social media. It is worth noting that Rinkeby only works with the Geth client.
Goerli
This is another proof-of-authority testnet that is compatible with all Ethereum clients. It has a massive network size, a wide range of nodes, and a bigger spread compared to Rinkeby and Kovan.
Sepolia
This testnet came to the fore in 2023. It uses the Proof-of-Stake as the consensus algorithm and even boasts a faucet for allocated free ETH.
Kiln
As termed as the merge testnet, this network is a fork of Goerli and perfectly suitable to replicate the final state of Ethereum 2.0.
Did you know? As of 2023, Ropsten, Rinkeby, Kiln, and Kovan are the deprecated testnets.
Installing Geth on different platforms
Now that the basics are out of the way let us install Geth on your machine. This is the first step to setting up a Geth node.
Do note that you must first install the Geth software on your PC to set up a Geth node. Once done, you must configure the same and connect to the Ethereum network.
Also, regardless of the platform you plan to install Geth on, you must use the Command Line Interface (CLI). This ensures high-end scripting and automation abilities. And once you understand the Geth commands, the command line interface (CLI) lets you type in and run shutdown, maintenance, and startup commands in relation to the node.
Now let us get to the installation.
MacOS
To install Geth on the MacOS, you would first need to install Homebrew — a package manager that simplifies installation.
Considering you already have Homebrew installed, you simply need to open the Mac terminal and type in:
brew install geth
This command installs the Geth suite asap. However, if you want access to the entire Ethereum network, including Geth, here is the command to use:
brew tap ethereum/ethereum
brew install ethereum
All of that gets Geth onto your Mac system.
Ubuntu (Linux)
For Linux, you would need to use the Personal Package Archive or PPA — a software repository — to get Geth.
Here is the command list for the same:
sudo add-apt-repository -y ppa:ethereum/ethereum
Followed by:
sudo apt-get update
sudo apt-get install ethereum
Or
sudo apt-get install geth (in case you are only looking for the Geth suite and not the complete Ethereum suite)
Once you use the commands, the package list also gets updated. Also, it is worth noting that the Ethereum Foundation also maintains the PPA.
Direct installation
In case you want to move ahead without a package manager like Homebrew or PPA, as you might not always be on Mac or Ubuntu, you can install Geth directly. You can head over to the “downloads” page to get the stable release for your OS.
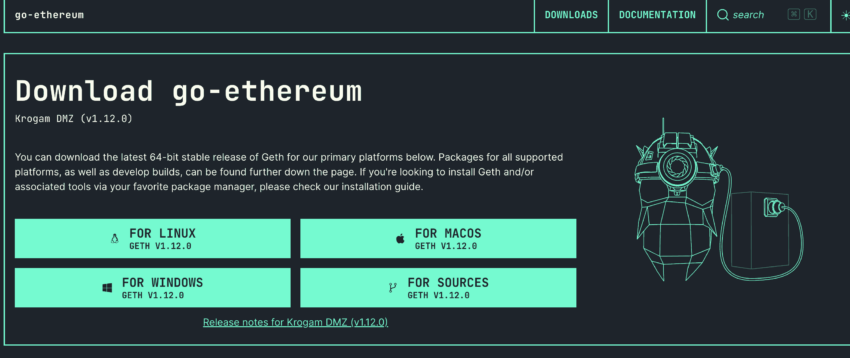
This approach is also helpful if you want to install Geth on Windows. For Windows-specific installation, you will still get a .exe file. However, direct download and installation will also require manual updates.
Inside Docker
You can use the Docker environment for Geth installation if you want to run the node inside a container or, rather, a secure environment.
For a Docker-based setup, you first need to install Docker using the download page relevant to Geth.
Once done, you should run the following command as part of the command line prompt:
docker run -it ethereum/client-go
And if this feels like a generic command, here is a more evolved one with additional traits:
docker run -d –name ethereum-node -v /Users/alice/ethereum:/root -p 8545:8545 -p 30303:30303 ethereum/client-go
This command has your docker function running in the background, has a well-defined directory for Ethereum data access, and mentions the ports of remote procedure call (RPC) and peer-to-peer network connectivity.
Note: The alice/ethereum directory portion is random and might differ on your system. Also, a different variation of ‘docker run’ exists.
Building from source
If you prefer the Geth source code and plan to build your own version as part of an advanced installation method, we hear you.
As the source code is available on GitHub, you can play around with this as long as you know how “Go” — the programming language — works. To start, you should have “Go” installed on the system. Once there, you need to clone the GitHub repo and then use the following command to build Geth:
git clone https://github.com/ethereum/go-ethereum.git
cd go-ethereum
make geth
Now that we are done with the installation, let us run the Geth node.
Running the Geth node
Once installed, you must prep for running the Geth node. For now, let us consider that we would be connecting the Geth node to a testnet.
Starting Geth
To start Geth, type “geth” in the command line interface. For now, let us prepare a demo command with the following aspects:
- Using the same as a light node (we will come to the nodes later)
- Enabling the HTTP-RPC server (opening up the remote procedure call allows the Geth node to connect with other applications, like a reception desk.
geth –testnet –syncmode “light” –rpc (here is the command for your reference)
After this command, you can use different variations of the net command for different processes. For instance, the net.PeerCount command lets you check the number of peers the node is connected to. The number should be greater than zero as you want peer connections for constant updates.
However, before adding in the PeerCount command, you need to type in the following:
geth attach
This opens the Javascript console or, in simple words, allows interaction with your Geth node.
The state of the nodes
As far as Geth nodes and their forms are concerned, you can set one up as a:
- Light node: These nodes do not save a copy of the blockchain. Also, they are known for faster startups and low storage requirements.
- Full node: These nodes verify transactions. If you set your Geth node as a full node, your PC must store the entire blockchain data. This works well in terms of security considerations.
- Archive node: These nodes add to the historical state of the network and store everything that a full node would. These nodes are meant for querying and ensuring network wellness.
What is the node syncing process?
Once you start the Geth node, you should use the “eth.syncing” command to check the current sync status of the node. If the node is fully synced, the “false” return command will show up. And if the sync is ongoing, something with the highest block, current block, and other metrics will show up.
{
currentBlock: 745600,
highestBlock: 889705,
knownStates: 2878340,
pulledStates: 2878340,
startingBlock: 745398
}
When it comes to the nature of the node syncs, you can choose between the following:
- Full sync: Downloads the entire chain, starting from the Genesis block.
- Fast sync: Downloads the snap of the recent state and then moves forward. It is the default mode.
- Light sync: Only downloads block headers and on-demand data
- Snap sync: Downloads dynamic snaps and saves a lot of storage space. It is the latest syncing process.
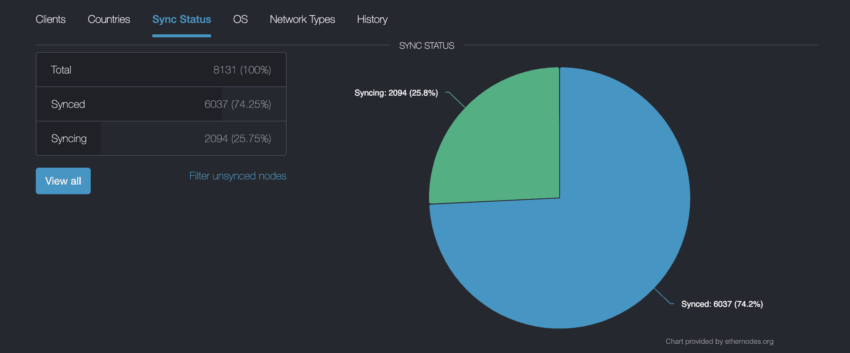
The sync times associated with Geth have improved over time.
“Just reset my phone and reinstalled everything. *Skype* took much longer to sync than geth or parity do.”
Vitalik Buterin, co-founder of Ethereum: Twitter
Connecting to the Geth node
Remember when we used the geth attach command to allow interaction with the Geth node? However, that is for an existing instance. If you want to start a Geth client and then connect to the instance, geth console is the right command to use. Using this command opens up Geth for additional commands in case you want the node to interact further with Ethereum.
Other ways to connect include activating the –rpc function right at the onset to activate the HTTP-RPC server. Do note that RPC is a way to connect to the blockchain. There is the IPC (inter-process communication) interface as well, allowing the Geth node to interact with the same machine in the form of local access. This kind of interfacing can improve security.
Becoming a validator using the Geth client
The Geth client also allows you to become a validator using the 32 ETH deposit limit. Here are the steps to do so:
- First of all, get hold of 32 ETH.
- Set the Geth client up, or you can use a handful of Ethereum 2.0 software solutions like Prysm, Nimbus, or more.
- Generate your validator key pair and store the same in the Geth keystore directory.
- Create a deposit contract, open the geth console, and move the 32 ETH to that contract.
- Once the deposit is confirmed, the validator status will get activated.
Do note that the process of turning the validator is far more complex, and this is just a simple representation of the same.
Various command line utilities offered by the Geth
Your Geth node lets you interact with the Ethereum protocol. Do note that we have already used a few like Geth, geth.attach, geth.console, and more.
Here are some of the command line utilities for the same:
- Clef: used for signing transactions
- Ethereum Virtual Machine (EVM) (evm –code 60ff60ff –debug): for executing the EVM bytecode
- Ethkey (ethkey generate random): for managing Ethereum keys
These are only a handful of basic commands.
How to set up a private blockchain using Geth?
By now, everything you need to know about installing and running a Geth node should be clear. But do you know that once Geth is all up and running, you can use it to set up a private blockchain? Here is how:
Step 1: Start by creating a genesis block
You would need to set up the first block of the chain. You would need a JSON file to define the genesis block. Here is how it might look:
{
“config”: {
“chainId”: 2023,
“homesteadBlock”: 0,
“eip155Block”: 0,
“eip158Block”: 0
},
“difficulty”: “400”,
“gasLimit”: “8000000”,
“alloc”: {}
}
chainID: unique identifier
homesteadBlock, eip155Block, and eip158Block are the initial blocks to enable EIPs
Step 2: Initialize the chain using the genesis block
To initialize, you would need to use the init function. And you need to create a new directory to support local access. You can name this directory myprivatechain.
Here are the commands to use to initialize the new chain:
mkdir myprivatechain
geth –datadir ./myprivatechain init ./genesis.json
Notice how geth uses the directory and the JSON file to initialize the private blockchain.
Step 3: Setting up the chain
Once initialized, you can use the following command to start the private chain:
geth –datadir ./myprivatechain –networkid 2023 console
Do note that the networkID should match the chainID while setting up the genesis block.
This process sets up the private blockchain using Geth.
Is it worth setting up a Geth node?
Setting up a Geth Ethereum node is certainly worth the effort, as it lets you experiment with new DApps and smart contracts. Plus, the blockchain node lets you remain in control of the validation process and even your wallet keys. With a Geth Ethereum node, you can create your own personalized way of interacting with the Ethereum protocol.
Frequently asked questions
How do I install Geth on Linux?
How do you run a light node with Geth?
How do I connect to a local Geth node?
What is the default port of Geth?
Disclaimer
In line with the Trust Project guidelines, the educational content on this website is offered in good faith and for general information purposes only. BeInCrypto prioritizes providing high-quality information, taking the time to research and create informative content for readers. While partners may reward the company with commissions for placements in articles, these commissions do not influence the unbiased, honest, and helpful content creation process. Any action taken by the reader based on this information is strictly at their own risk. Please note that our Terms and Conditions, Privacy Policy, and Disclaimers have been updated.


