DragGAN AI represents a new frontier in the evolution of AI image editors. With a drag-and-drop interface that’s as intuitive as using a toaster, it brings a refreshing approach to photo editing. That said, while DragGAN is easy to use once it is properly set up, the initial setup process does demand a certain level of technical proficiency. And that’s precisely what this detailed guide explains. Dive in as we explore the rich potential of DragGAN and guide you, step-by-step, through installing and using the image editor.
Most popular AI Generator 2023
ChainGPT NFT Generator

Wombot AI Image Generator
Picsart AI Image Generator
What is DragGAN AI?
DragGAN is an AI image editor for editing GAN-generated images. Put simply, it lets users “drag” content from point A to point B within images, much like moving icons on a computer desktop.
You click on a few points (let’s call them “handle points” because, well, you handle them). You drag them to where you want them to be (the “target points”). And voilà! The image morphs like it’s been hit with a magic wand. Want to keep some parts of the image fixed while you play Picasso with the rest? Just highlight the area you want to stay put, and DragGAN will respect your artistic boundaries.
Sure, DragGAN, like other AI image generators, taps into the brainy world of machine learning and neural networks. However, it is fundamentally different from other popular AI tools such as DALL-E 2.0 or Stable Diffusion. Let’s have a quick look at these differences to understand DragGAN better.
SponsoredWhat sets DragGAN apart from other AI image editors?
DragGAN is based on a GAN (generative adversarial network), while the likes of Midjourney, DALL-E 2.0, Midjourney, Stable Diffusion, etc., are based on diffusion models.
GANs and diffusion models are both types of generative models designed to produce new data resembling the data they’ve been trained on. Despite this shared goal, their methods for generative modeling differ significantly.
GANs operate through a competitive dynamic between two neural networks: the generator and the discriminator. The generator’s task is to produce new data, whereas the discriminator’s role is to differentiate between real, organic data and the data generated by the generator. As they’re trained in tandem, the generator aims to deceive the discriminator into accepting its created data as authentic, while the discriminator hones its skills to detect these imitations.
In contrast, diffusion models employ a distinct method. Beginning with a grainy image, they methodically refine and enhance it until it mirrors a lifelike picture. This enhancement technique, termed “diffusion,” essentially works counter to the concept of condensing images. To ensure the output is as close to the original as possible, diffusion models undergo training to reduce discrepancies between the generated and genuine images, utilizing a specific loss function that quantifies their differences.
So, in essence, GANs and diffusion models are like two artists with different specialties. GANs excel at creating images that tend to be more realistic. However, they can be resource hogs, demanding a lot from your computer’s processing power. On the other hand, diffusion models shine when it comes to generating unique, creative visuals. They might not always aim for photo-realism, but they bring a fresh perspective while being a bit gentler on your system.
GAN vs. diffusion models

A quick look under the hood
DragGAN was developed by a group of researchers at the Max Planck Institute. DragGAN’s development was driven by a clear need: while GANs are good at generating photorealistic images, tweaking specific parts of these images has often been quite challenging. Many existing methods, often relying on 3D models or supervised learning, were like trying to paint with a broad brush — they lacked the finesse and adaptability needed for diverse image categories.
That’s where DragGAN’s unique approach aims to make a difference. It uses what’s called interactive point-based manipulation. For example, if your cat’s pose in a photo seems off, you can effortlessly adjust it. Displeased with the sullen look in your graduation snap? No worries — with a few simple drags and adjustments, you can transform your expression into that of a jubilant, accomplished graduate.
This method offers control over various spatial attributes and doesn’t play favorites — it’s versatile across different object categories.
On the technical side, DragGAN operates in the GAN’s feature space. It uses a method called shifted feature patch loss to fine-tune the image’s latent code, ensuring those handle points glide smoothly to their target destinations. DragGAN proved its worth in trial runs across a spectrum of datasets, from lions and cars to scenic landscapes.
In essence, DragGAN is setting a new gold standard in image editing. It aims for a blend of precision, flexibility, and broad applicability, thereby emerging as a potential game-changer for both synthetic and real image editing.
Our method leverages a pre-trained GAN to synthesize images that not only precisely follow user input but also stay on the manifold of realistic images. In contrast to many previous approaches, we present a general framework by not relying on domain-specific modeling or auxiliary networks.
This is achieved using two novel ingredients: An optimization of latent codes that incrementally moves multiple handle points towards their target locations, and a point tracking procedure to faithfully trace the trajectory of the handle points.
– DragGAN research paper
How to install DraGAN AI
DragGAN works best with the following system configuration:
- Operating system: Both Linux and Windows work, but Linux is preferred for better performance and compatibility.
- GPUs: 1–8 high-end NVIDIA GPUs (at least 12 GB memory).
- Python & libraries:
- 64-bit Python 3.8.
- PyTorch 1.9.0 or newer
- Additional Python libraries are listed in environment.yml.
- CUDA: Toolkit 11.1 or newer.
- Compilers:
- Linux: GCC 7 or newer.
- Windows: Visual Studio.
- For Docker users: Install the NVIDIA container runtime.
You can use Anaconda (or Miniconda3) to create a virtual environment for DragGAN.
What is the DragGAN installation process?
Sponsored SponsoredStep#1: Download and install Python
- Go to the official Python website: python.org.
- Navigate to “Downloads.”
- Select the correct Python version. For DragGAN, you need Python 3.8 or a newer version.
- Click on the download link.
- Navigate to the downloaded executable file in your download folder, double-click on it, and follow the on-screen instructions.
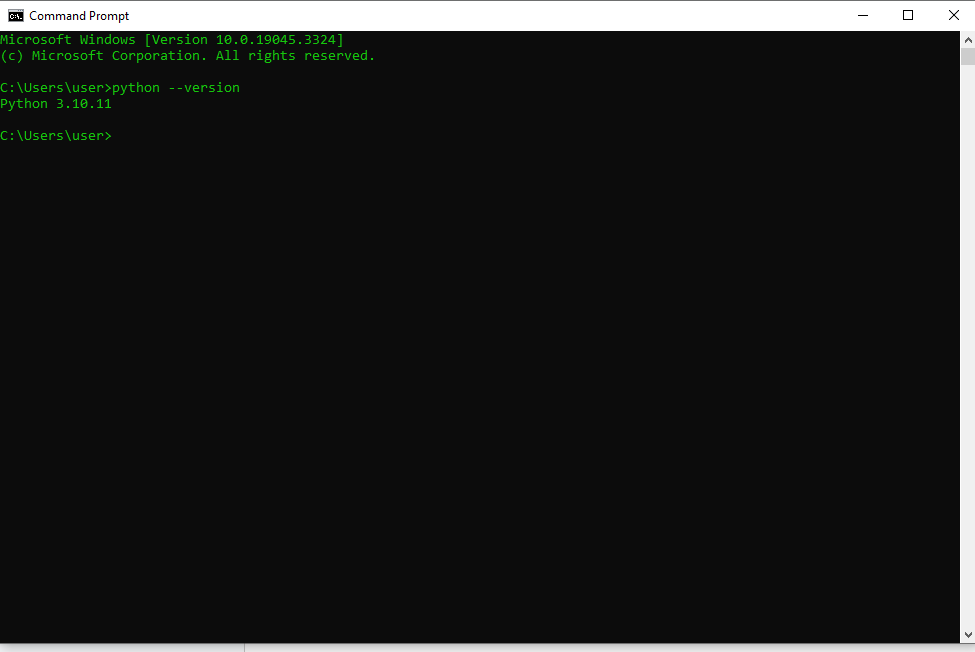
To double-check that you have installed the correct version,
- Launch the Start menu and search for “Command Prompt” (CMD).
- Once the terminal launches, type “python –version” and hit Enter.
The currently installed version of Python will be displayed as shown in the image below.
Step#2: Download Anaconda
- Access Anaconda: Search “Anaconda” in your browser, go to the official site, and head to the “Pricing” section to find the “Free Version.”
- Download: On the downloads page, pick the distribution for a 64-bit OS (Windows or MAC) and hit “Download.”
- Begin installation: Find the downloaded file, double-click to launch, and follow the setup wizard, accepting the license agreement.
- Installation preferences: Choose “Just Me” for individual use or “All Users” for everyone on the system. Stick to the default installation path.
- Wrap-up: After installation, adjust the settings as required (might not be required) and then click “Finish” to finalize the process.

Step#3 Install DragGAN AI
Set Up the DragGAN Framework:
- Navigate to DragGAN’s official GitHub repository.
- Use the green “Code” button to capture the link for the repository.
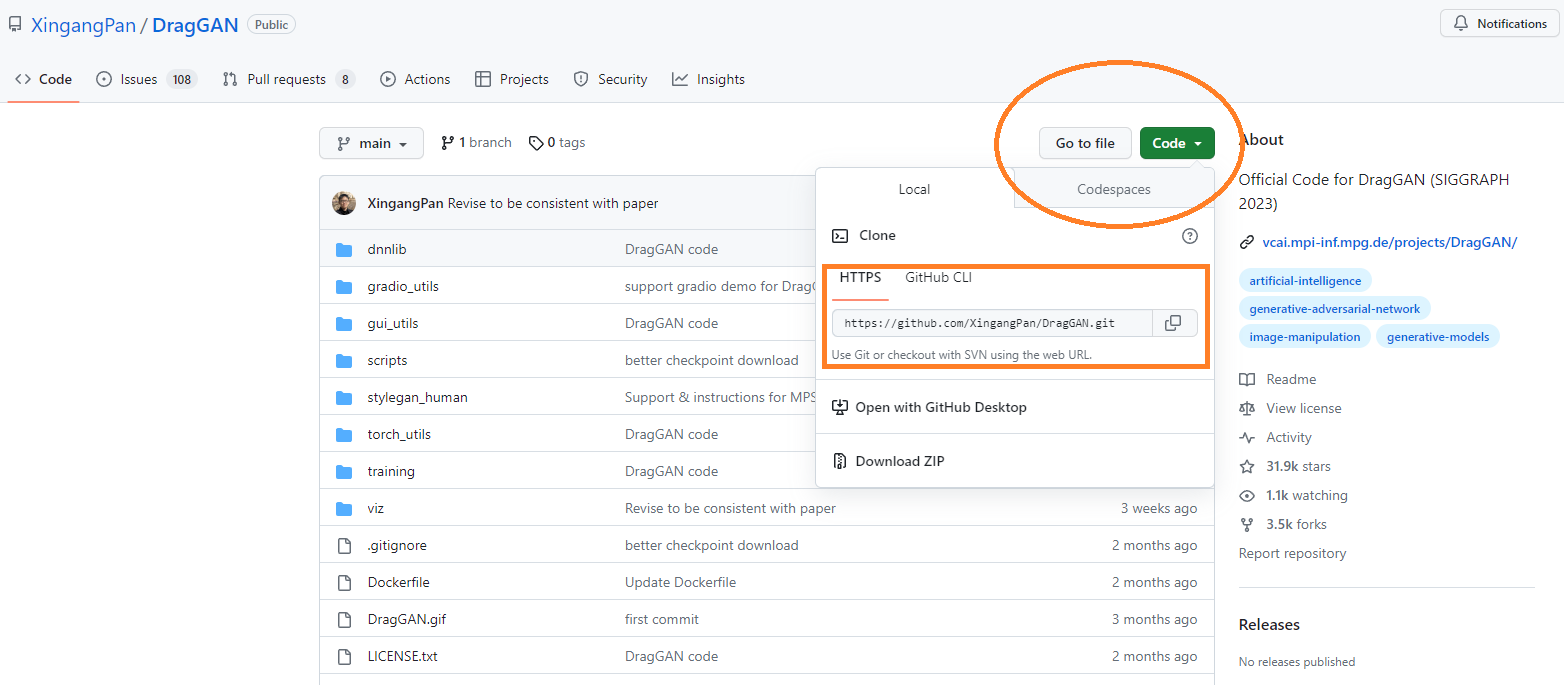
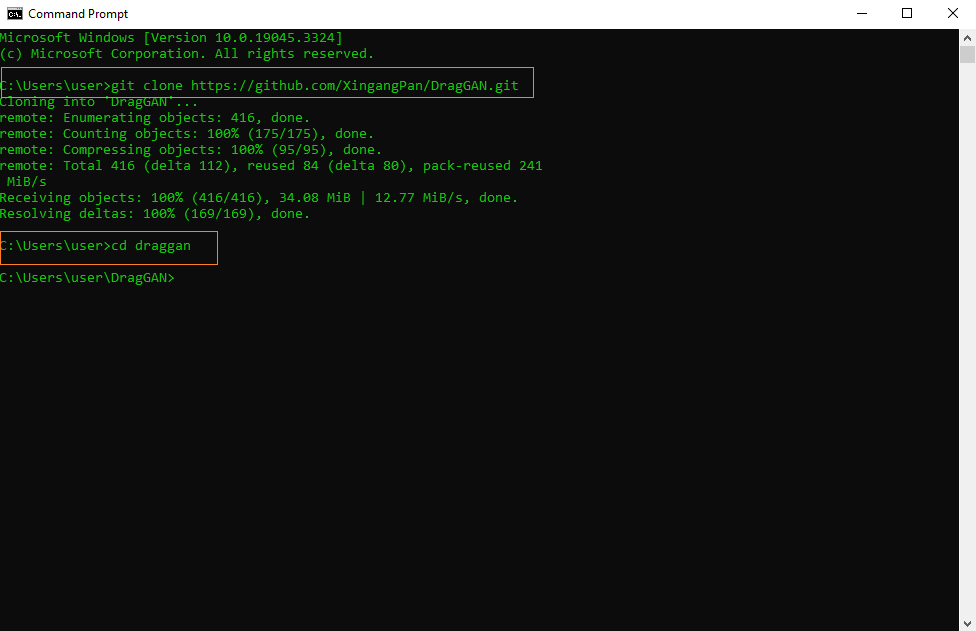
- Launch your terminal or command prompt, then head to your chosen folder.
- Use this command to clone: git clone [copied_link]. Ensure to replace [copied_link] with the actual URL, which is github.com/XingangPan/DragGAN.git.
- Switch to the DragGAN folder using: cd DragGAN.
Prepare the Conda Setup:
In the command prompt terminal, use this command to initiate the environment with the given environment.yml file:
Sponsored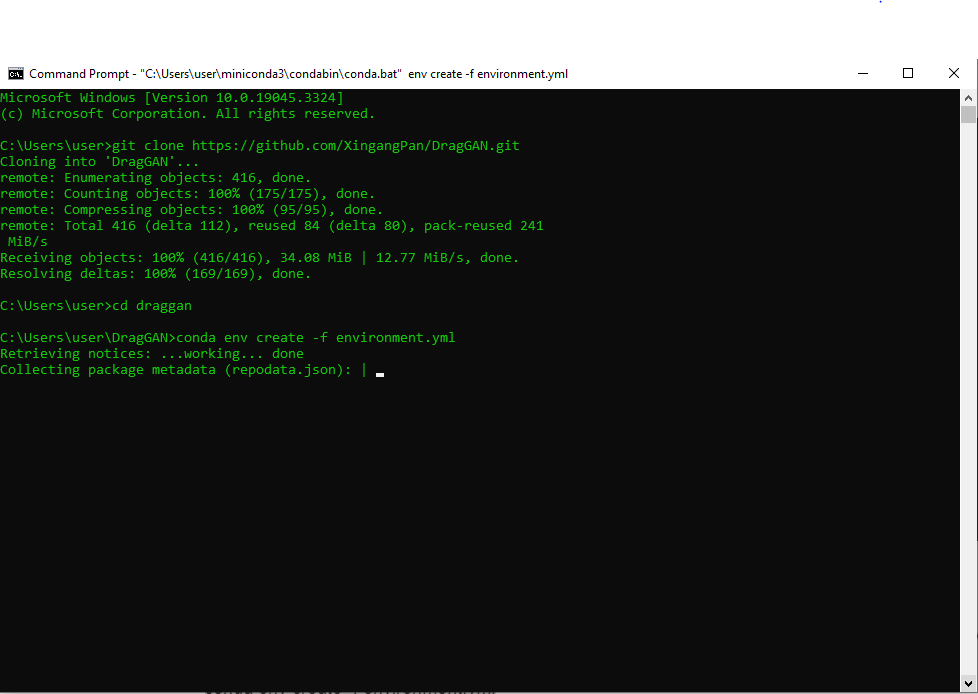
Now, activate the Conda environment with the following command:
Note that if you encounter an error here, try running the older activation command:
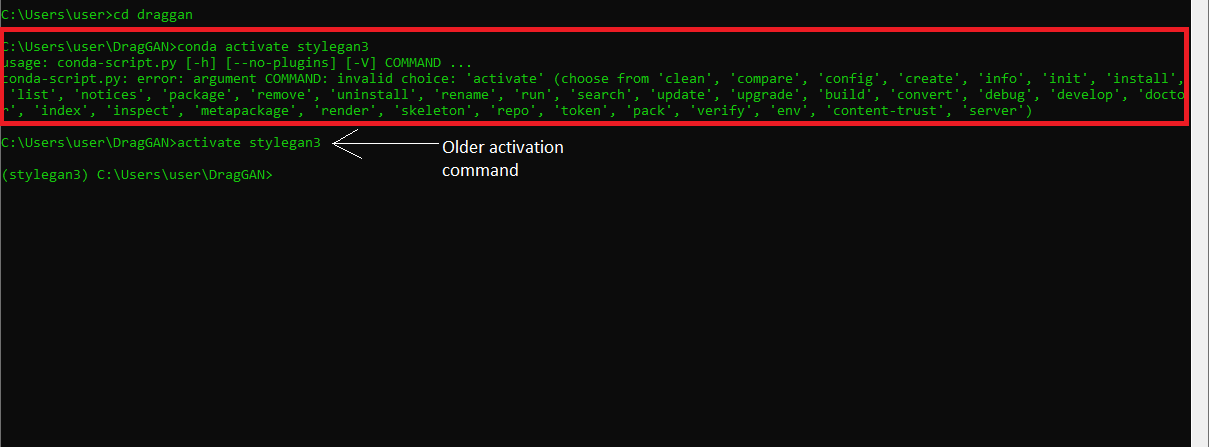
If all steps have been executed correctly and the conda environment is now active, your terminal should display:
Get the necessary Dependencies:
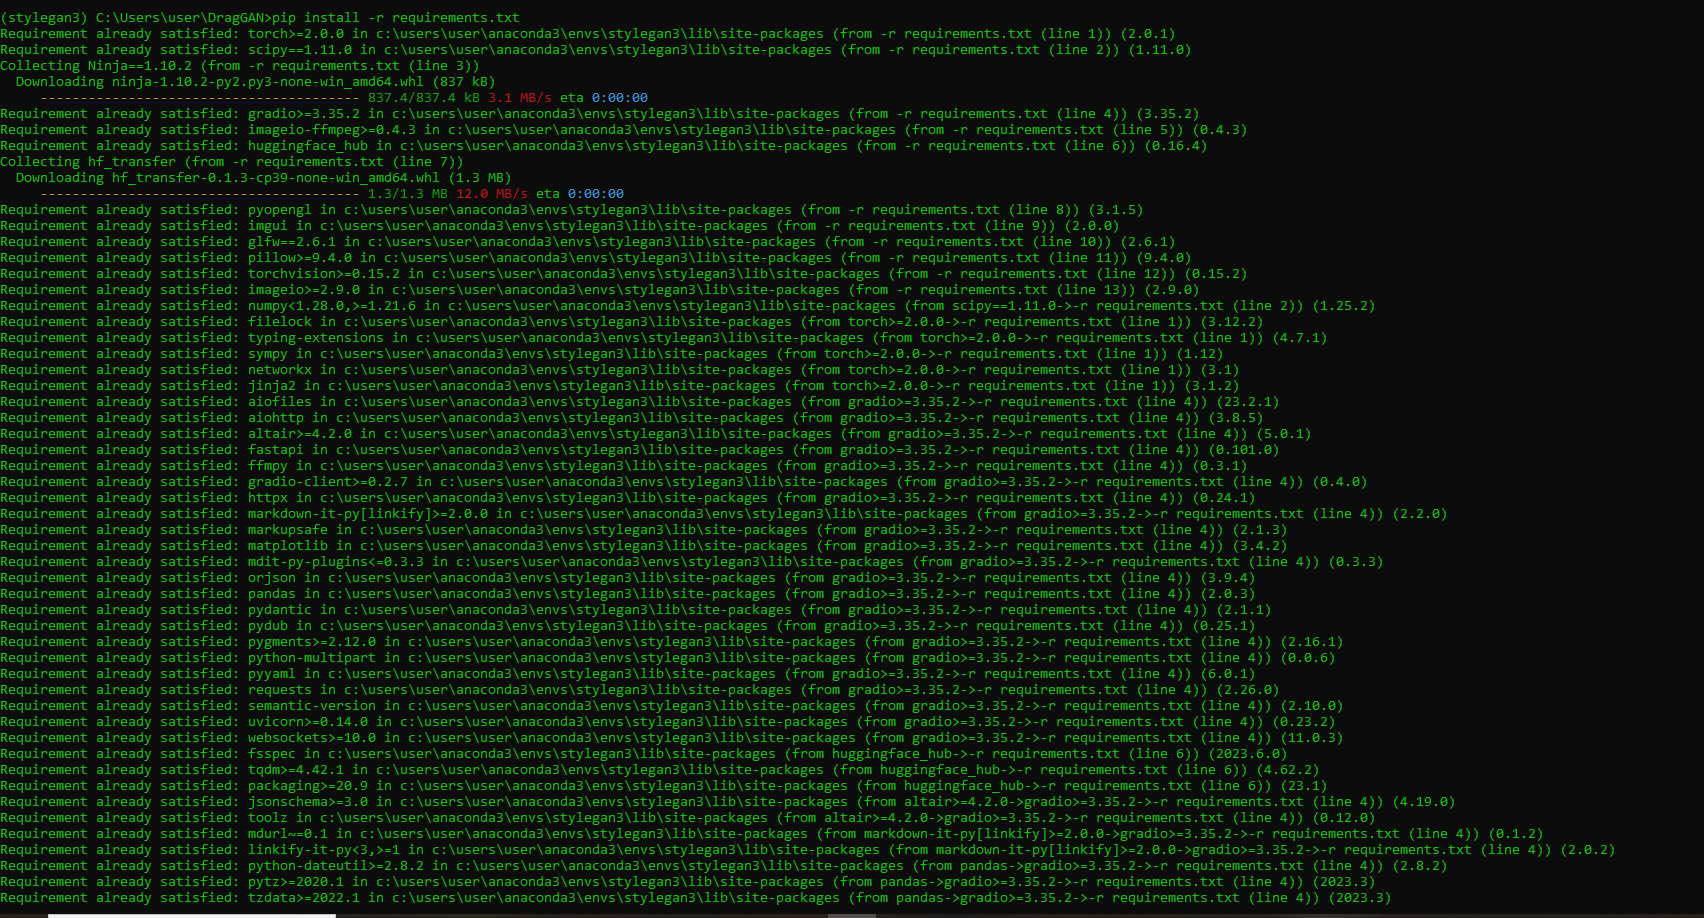
To fetch the necessary libraries, execute:
If you already have most of the packages installed in the environment as we did, the terminal will display the following message: “Requirement already satisfied.” Any package you don’t already have will be automatically installed.
Set MPS Fallback (Not required for Windows users):
For utilizing the Metal Performance Shaders (MPS) library and switching to CPU if necessary, run:
export PYTORCH_ENABLE_MPS_FALLBACK=1
Acquire Pre-configured Models:
Fetch the models that come pre-configured by using:

Run the DragGAN GUI Tool:
Initiate the DragGAN AI GUI with:
If you encounter any error here, try uninstalling the “torch” library and then reinstalling it.
You can uninstall and reinstall torch using the following commands:
If all steps have been executed correctly and the DragGAN graphical user interface is ready to launch, you will get a confirmation message in the terminal that reads something like this:
Running on local URL: http://127.0.0.1:7860
Running on public URL: https://a8aeb5c99e1ecdde7c.gradio.live
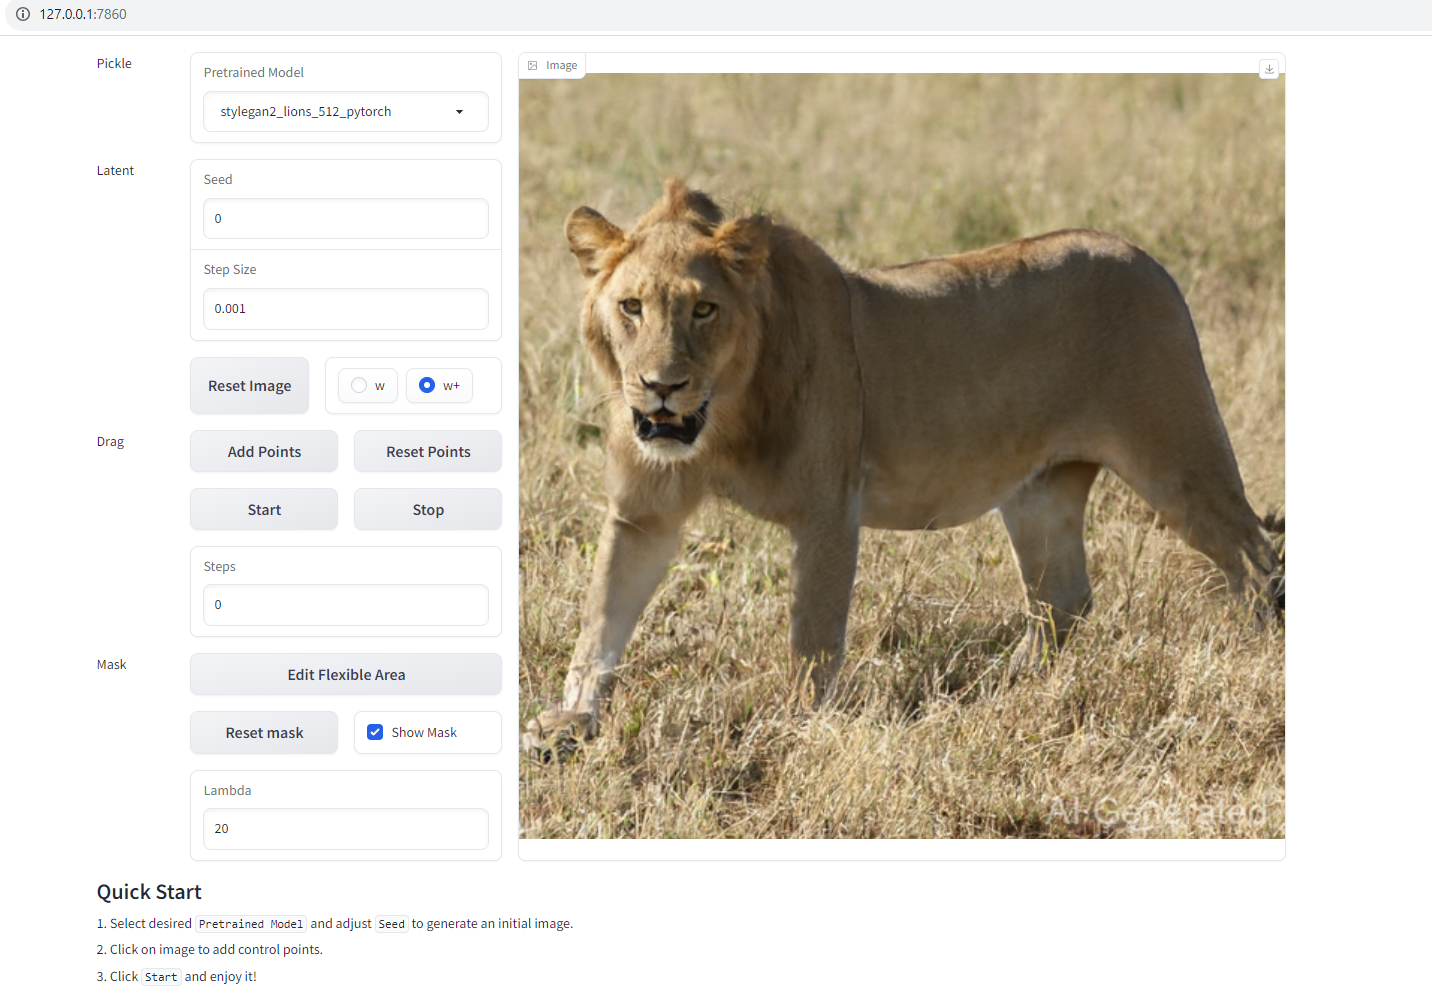
You can summon the DragGAN AI GUI by copy-pasting either of the two URLs on your favorite web browser.
How do you use DragGAN AI?
Whether you’re jazzing up selfies, your pet’s candid moments, scenic getaways, or that sweet ride you snapped a pic of, DragGAN’s got you covered.
So, here’s how you roll with DragGAN:
- Pop open your browser, hit up that local URL, and that’s it! Welcome to the DragGAN interface.
- Spot the top-left corner? Choose the right model that vibes with your pic’s star (puppies, stallions, your buddy Maggie, you name it).
- Next up, tap on that image. Pinpoint a few spots (use the ‘Add point’ option). Do you want to get all artsy? Add some more spots for that extra flair.
- Done plotting? Hit that “Start” button, and let the magic begin.
- As DragGAN works its charm, your terminal will chit-chat, spilling details about the makeover stages.
- Heads up! If the counter goes silent after hitting 100, give it a gentle nudge (manually stop it).
- Once your masterpiece is ready, there’s a download button chilling in the top right. Give it a click, and save the edited picture.
- If you’re itching to try a new look or goofed up, no stress! “Reset Points” has got your back.
Remember, DragGAN’s still a work-in-progress, learning new tricks every day. The team behind it is constantly tweaking and tuning the tool to introduce new features and capabilities.
How much does DragGAN AI cost?
As of mid-August 2023, DragGAN AI is in its early stages of development. The team behind it has made it available for free on GitHub. If you want to explore its capabilities, you can download it from the project’s official GitHub page. The team has not yet disclosed any information regarding potential future pricing or monetization strategies.
DragGAN AI’s value is in its potenital
Long story short, DragGAN AI features and use cases have potential. Its capabilities could revolutionize photography, image editing, and related industries by transforming how we interact with and manipulate images. That said, its capabilities are overhyped in its current avatar. Many overlook the fact that you can not just use it to edit and manipulate any image you want. For instance, to edit an image from your phone’s gallery, you first need to do a GAN-inversion on the pic using specialized tools. For the uninitiated, GAN inversion is the process of mapping a real image back into the latent space of a GAN.
Also, don’t forget that while its features are impressive, DragGAN AI demands significant computational power. You need a high-end GPU setup to smoothly operate it locally on your computer. As with any tool in its early stages, there’s room for growth and refinement. When juxtaposed with other AI tools, DragGAN’s focus on making image interactions more natural is evident, and that sets it apart from other popular AI image editors.

