


There are many to analyze the price expectations of a high beta asset, like cryptocurrency and stocks. While reading through the asset fundamentals is a good strategy, technical analysis works best for those interested in short- and mid-term price projections. Yet, technical analysis is a diverse arena. Chart indicators and patterns make it harder for newbies to make sense of the market. And while some patterns can be hard to decode, this guide focuses on the cup and handle pattern — a bullish sign with excellent credibility and reliability.
The cup and handle pattern is one of the rare sighters that can actually validate the likelihood of a price surge. Here’s what you need to know, from the pattern’s anatomy, identification strategies, and complementing indicators, to real-time examples showing the best ways to trade the pattern.
BeInCrypto Trading Community in Telegram: read the hottest news on crypto, discuss the market trends & get technical analysis on coins from PRO traders & experts!
Unpacking the cup and handle pattern

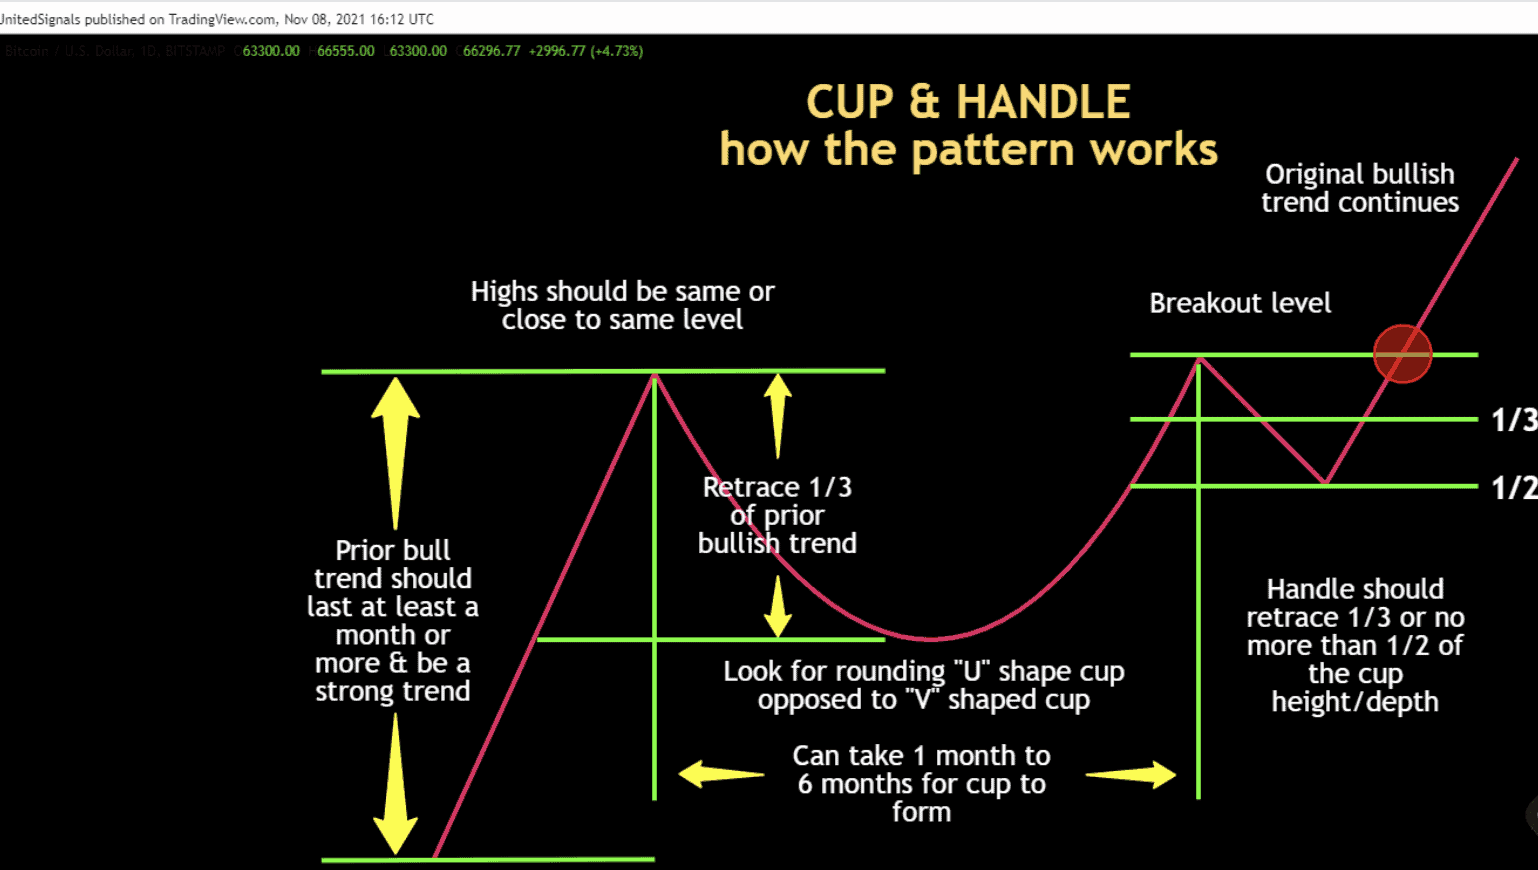
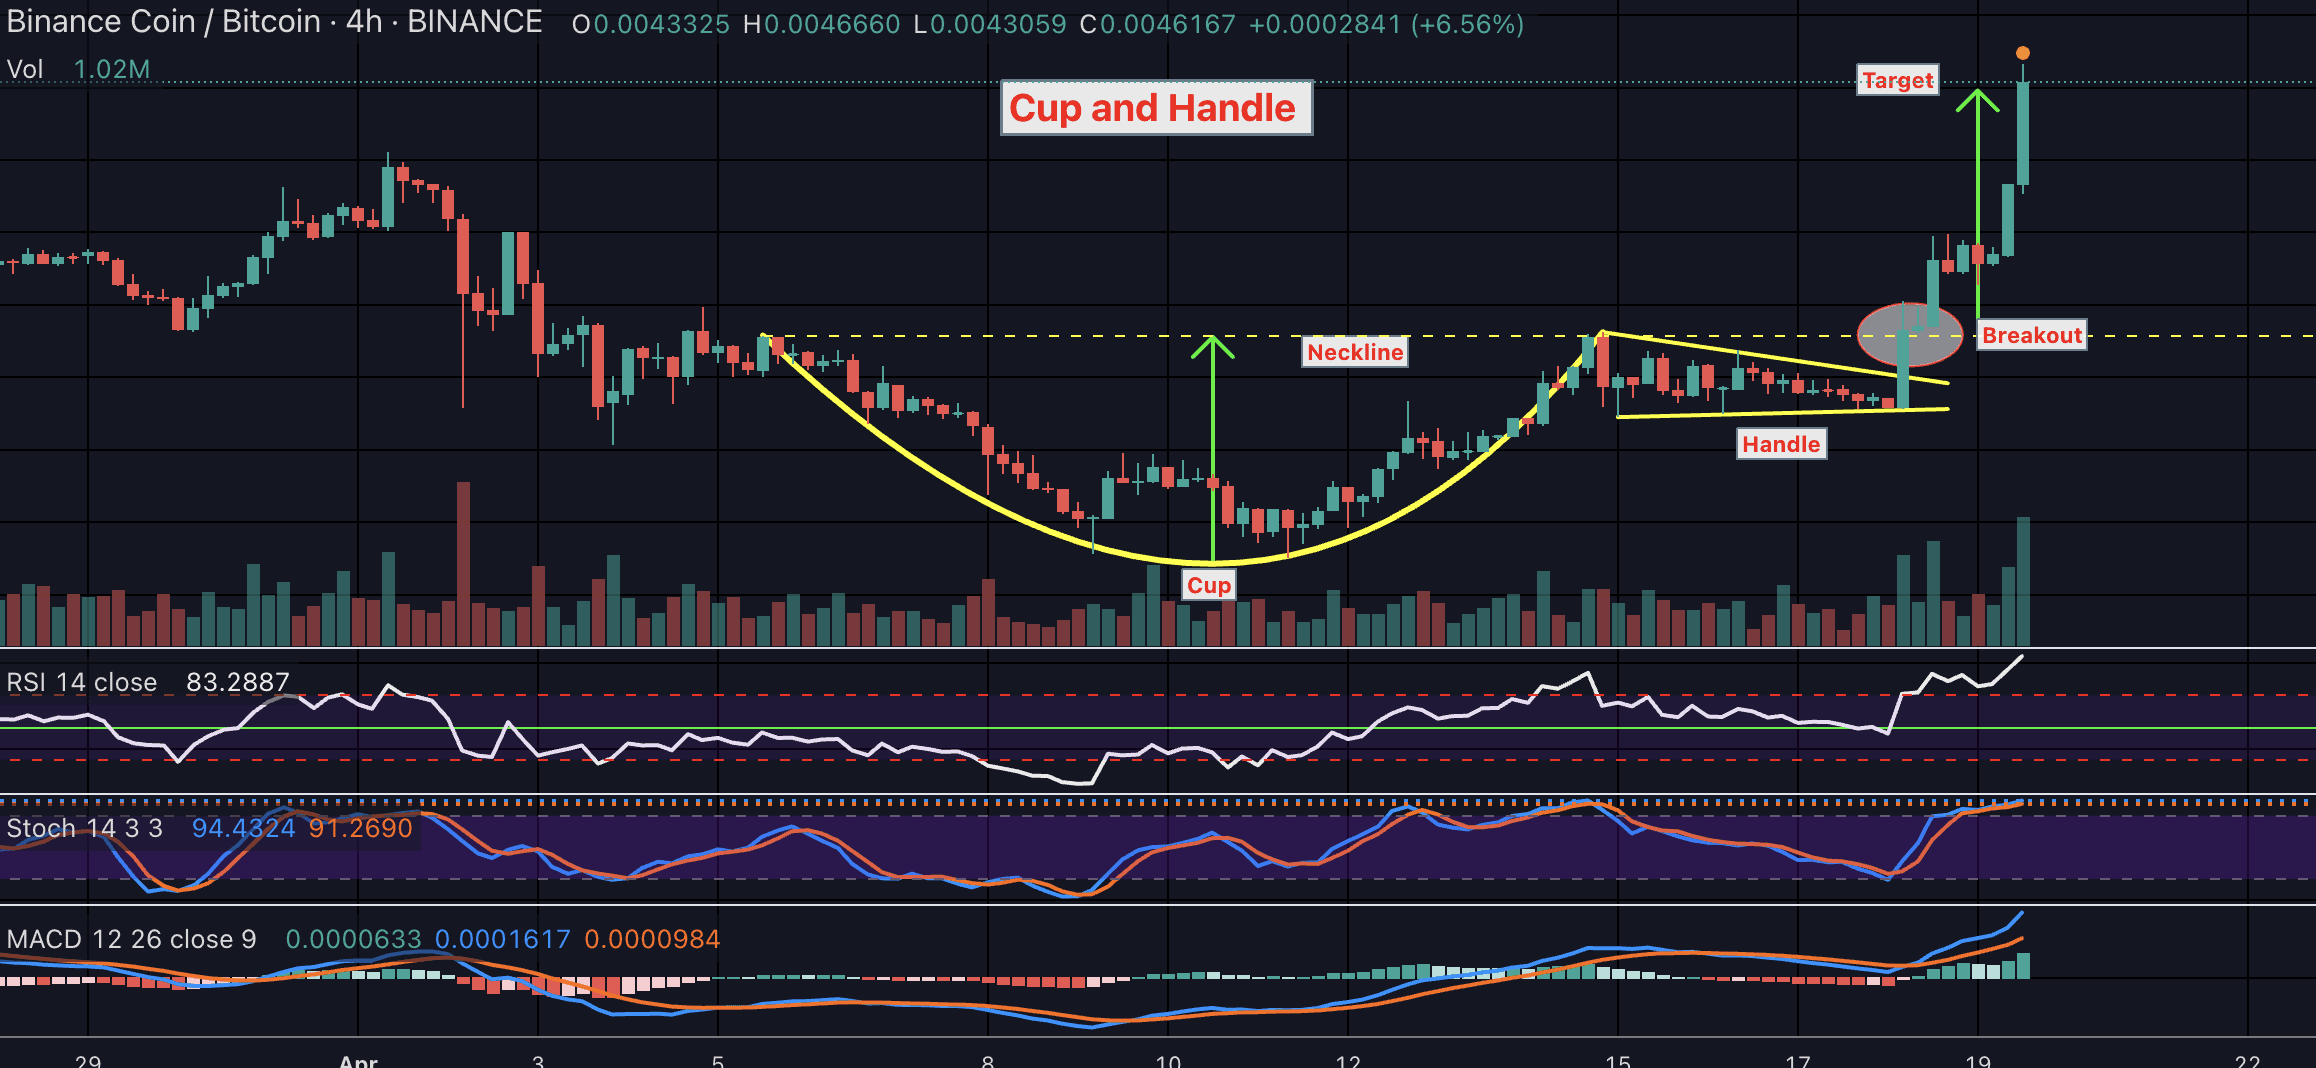
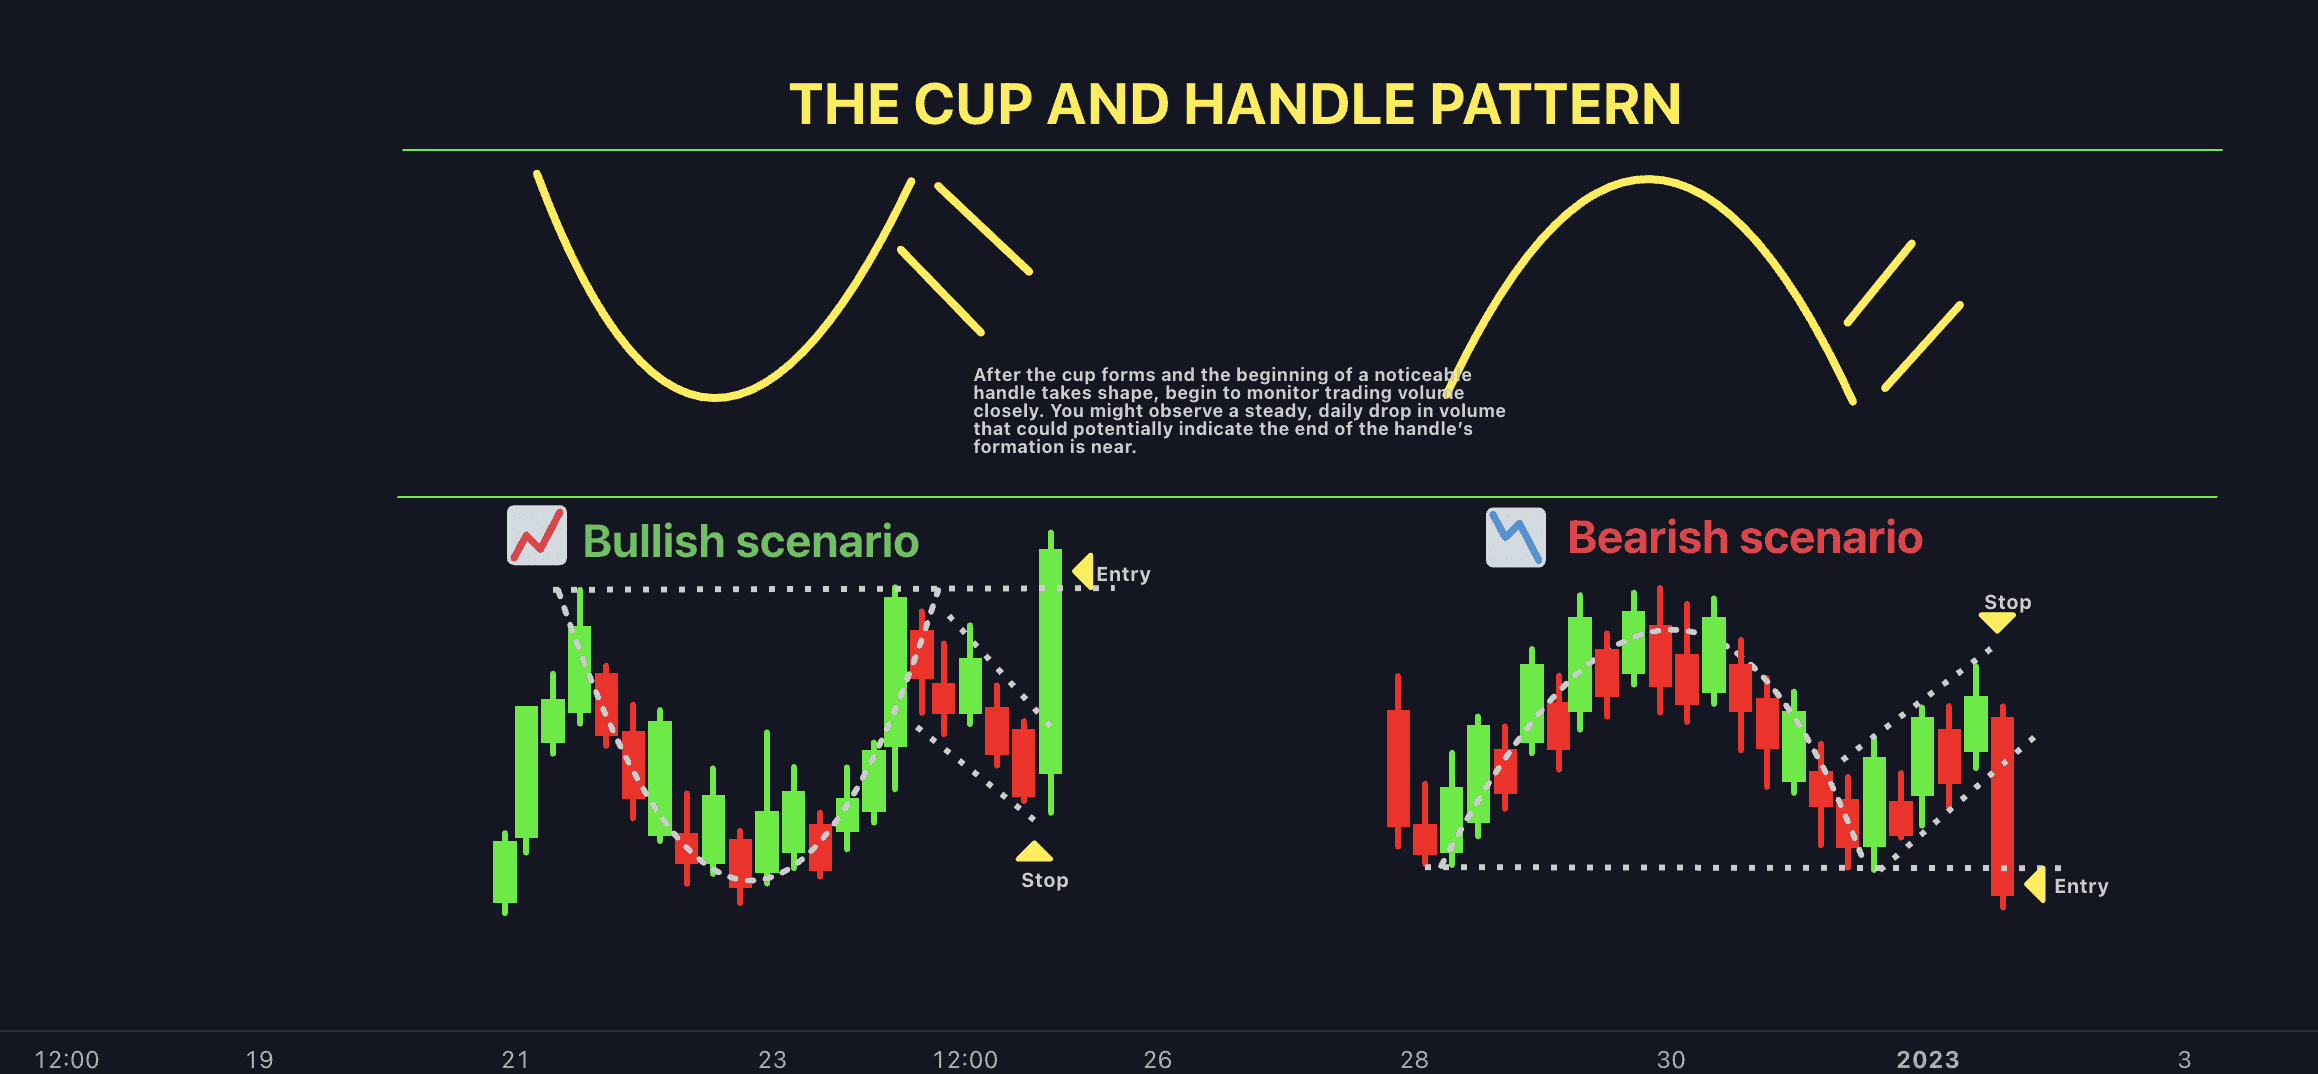
The cup and handle pattern is a standard yet credible “bullish continuation” pattern, indicating the asset’s chance of a price surge. The pattern gets its name from the fact that it resembles a teacup “cup” — a period of rapid and extended price correction and the rise and a handle that is depicted by a smallish period of downward-sloping consolidation.
The origin
Like most good things, the cup and handle pattern has a defined origin. Author and investor William O’Neil observed and talked about this chart formation in this 1988 book — “How to Make Money in Stocks.”
According to his book, this formation comes with the ability to help traders predict breakouts. He also mentioned the role of “Good Fundamentals” as a prerequisite.
Did you know? William O’Neil, the investor who coined the cup and handle pattern, also founded the Investor’s Business Daily, a leading financial newspaper, in 1984.
Analyzing the cup and handle pattern: psychology and applicability
Firstly, the cup and handle pattern isn’t the only bullish continuation pattern.
There are others, including the flag pattern and ascending triangle. However, things are a bit different with the cup and handle courtesy of the following traits:
Well-defined psychology
Upon close analysis of the cup, the price correction eventually turns into a bullish price surge, showing that sellers are slowly fizzling out. The upper portion of the cup shows that the buyers are taking center stage, pushing forth a bullish narrative.
Even the downward-sloping handle has a clear meaning. It feels like a breather taken by the buyers before continuing the upmove. And this consolidation is meant to shake out the remaining weak hands before the uptrend resumes with confidence. Hence the name — bullish continuation.
For any asset, the appearance of the bullish continuation pattern means that the volatility surrounding that is also easing out.
“Short-term volatility is greatest at turning points and diminishes as a trend becomes established”
George Soros, investor and hedge fund manager: The Alchemy of Finance
Volume shift
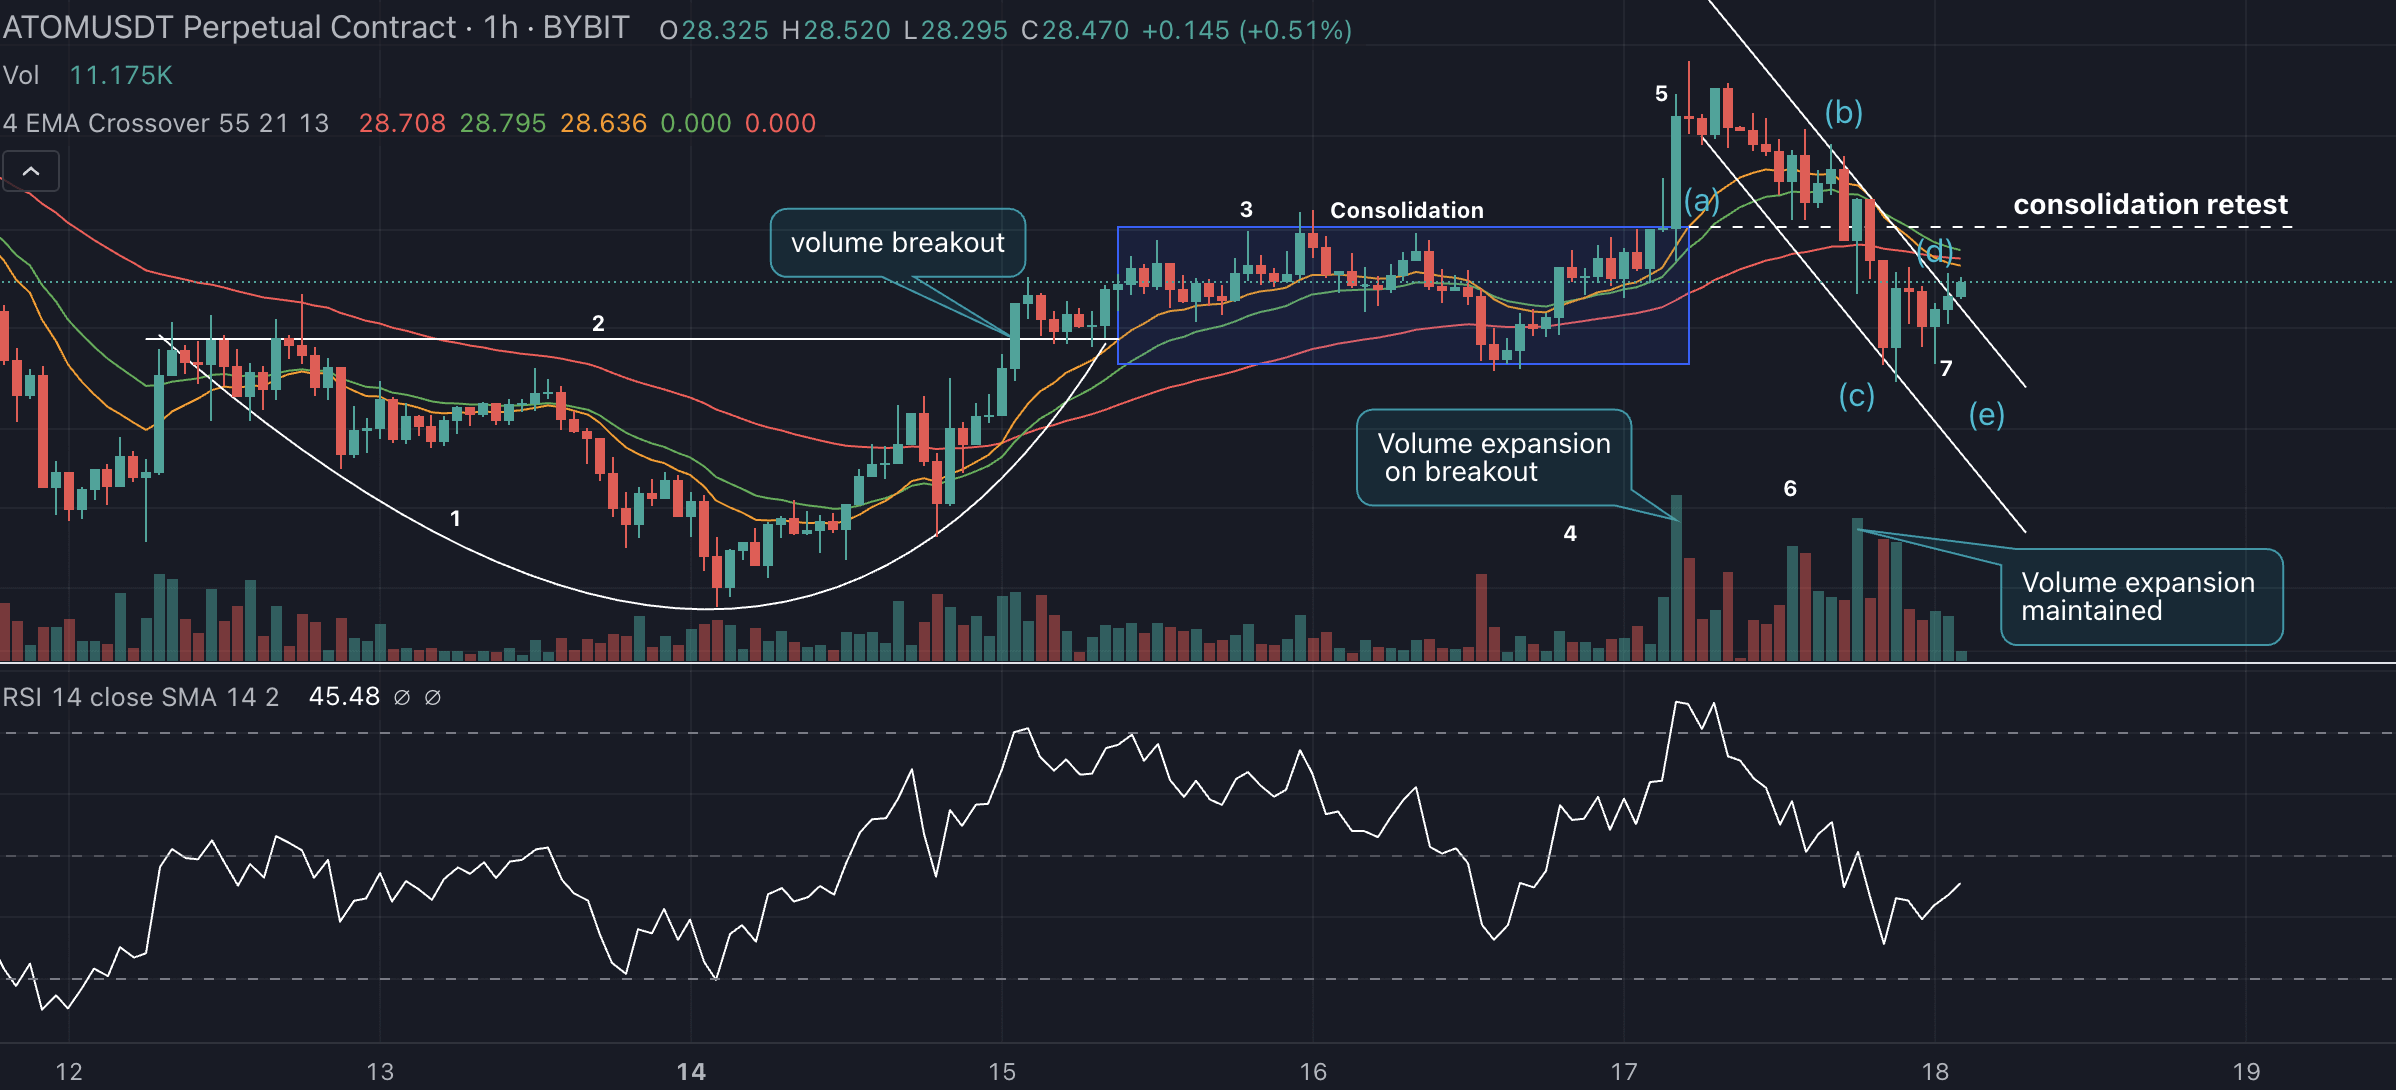
If you are looking for trading opportunities, it is advisable to look at the volume shift. For a cup and handle, the volume is generally on the lower side for the “cup” part and ends up building higher once the “handle” starts forming. This clear shift in the volume makes this pattern more reliable and credible.
Clear entry and exit positions
As a well-defined pattern, the cup and handle pattern offers traders clear entry and exit points. Once you have identified the depth of the cup — preferably by ascertaining the shift in volume — you can identify price targets by tracking the multiple resistance levels. Also, the resistance line formed by the handle can indicate the breakout zone for the asset.
The trading range depicted by the handle alone helps risk-averse traders create a solid risk management strategy. The handle mostly trades in a channel and therefore comes with clear stop-loss exit points in case the formation steers from the normal path. Simply put, if the cup and handle formation becomes invalidated, it is easy to tell.
Timeframe agnostic
Finally, the cup and handle formation is relevant across timeframes. For instance, if you are in the market for a short-term price movement, you can look at this chart pattern in a 1-hour or a 4-hour timeframe. For mid-term analysis, a daily chart pattern and price breaks make sense. And for defining a broader trading strategy, chart formation on the weekly chart can also offer vital insights.
It is safe to mention that this chart formation — the cup and handle — can identify the key breakout levels along with the market psychology. All of this makes it one of the more accessible and easy-to-understand patterns in technical analysis.
Anatomy of the cup and handle pattern
The anatomy of a cup and handle formation is crucial as it allows you to identify the chart formation and plan a trading strategy accordingly. Also, this discussion regarding anatomy considers that a formation is already in. We are simply unpacking its components to learn the meaning of each element.
Sides of the cup
The cup has two sides — the left represents the initial price decline, and the right represents the subsequent price recovery. For the sides to adhere to the cup and handle physiology, they should be relatively symmetrical. The sides of the cup should converge to form a “U” or a spread-out “V.” Do note that a sharp “V” isn’t what would make sense.
Depth of the cup
The left side of the cup is like a steep fall from a high, as it showcases the price decline. The region where the left side formation ends and the right side formation starts is marked as the depth of the cup. This is the point where the tables turn, with the selling pressure and weaker hands going down. Being able to measure the depth of the cup is necessary as it allows aggressive traders to identify the maximum profit potential.
Ideally, the depth — distance from the high to the bottom of the cup — should be less than 50% of the previous price surge made by the asset before the cup and handle formation started. The best way to locate this is to identify the last instance of an uptrend and see how much the price moved — from a previous low to the start of the left side of the cup. Consider this move as the benchmark and see to it that the depth is less than 50% of the same.
A deeper cup might invalidate the bullish formation and might indicate a reversal of sorts. If you are unsure about the depth mid-pattern, look for reversal candlestick patterns and proceed accordingly. If there are no bullish reversal candlesticks to work with, there might be two scenarios in play:
- You might be looking at a falling knife with the bottom still not in.
- A depth higher than 50% of the previous price surge might kickstart a bullish reversal formation like a double bottom or an inverted head and shoulders.
Therefore, it is necessary to adhere to the 50% rule just to be on the safer side.
The bottom of the cup
The bottom of the cup is where the teacup is the deepest. This is the exact turning point; you can validate the same by pulling out the volume chart. For a successful and clear cup and handle formation, the volume will start to be more buyer-friendly at this point. A reliable chart pattern always has a more rounded bottom. Anything sharp or abrupt might not be a good sign.
Resistance line and resistance levels
As mentioned, the chart formation’s cup element has well-defined resistance lines. The initial resistance line is at the top left of the chart, from where the initial correction begins, all the way to the bottom. This resistance line works as the support level of a prior uptrend, and once the asset starts dipping (forming the left side of the cup), the weaker hands start moving out.
This resistance line starts from the left and can be extended to the right side of the chart, helping traders identify the potential of the price gain from the bottom. If the prices break this resistance line, the bullish trend might just continue.
Handle formation
The handle formation represents a last-ditch effort from a handful of sellers to push the prices down. Or you can consider this a breather taken by the buyers to shake out the weak hands. The handle is a sloping consolidation that should be restricted to the upper half region of the chart.
Pro tip: The handle shouldn’t drop beyond one-third of the cup’s depth for the formation to look credible. As for the shape of the handle, anything from a descending channel to a wedge to a pennant to a flag works just fine. You should always tally the handle formation with the volume indicator. Do note that the pattern is usually followed by decreasing volume, and only the breakout pushes the volume up.
Trading range
The trading range corresponding to a cup and handle formation shows up in two phases. One is between the resistance line and the bottom of the cup, and another between the resistance and support lines, demarcating the handle part of the pattern. In either case, the range is where the consolidation happens. Trading ranges like these allow entry to traders, who can then look at secondary resistance and support lines to make strategic calls.
Overall, based on the anatomy, every cup and handle formation has four stages before the supposed breakout:
- Setup: Involves an uptrend from a previous low. It should move high by at least 30% to qualify.
- Decline: This is where the base of the cup is formed.
- Recovery: At this point, the weaker hands start disappearing the price starts to move toward the last point of the previous uptrend.
- Consolidation: At this point, the surging price pivots and experiences a consolidation, which should not drop more than one-third of the pattern’s depth.
Do note that the volume indicator should also form a base to align with the cup’s bottom.
Identifying the cup and handle pattern

Now that we know the traits and the anatomy of the chart formation let’s move to identification with relevant on-chart metrics.
Time frame considerations
As mentioned earlier, the cup and handle pattern works with almost every timeframe. However, it is more accurate when viewed on a higher timeframe — such as a daily, weekly, or even monthly chart.
If you are a position trader, the idea should be to look for this chart pattern on the weekly or even monthly timeframe. Swing traders can look at daily or weekly timeframes to make accurate calls. And even though it might also work for scalping — via the minute and hourly chart — the reliability decreases here.
Price movement and price levels
A good strategy to identify the chart pattern is carefully looking at the price movement across multiple zones. These are the pointers to check:
- A prior uptrend before the cup started forming
- Measuring the distance between the last high and the depth of the cup
- Handle formation restricted to the upper zone of the cup
Chart pattern validation
Like any other aspect of technical analysis, even the cup and handle can give out a misleading signal. To validate a formation as being correct, check for the following things:
- The symmetry between the left and right sides of the chart
- Rounded bottom and not an abrupt “V” formation
- Clear handle resistance levels, primed for a breakout
- Broader market scenario in the case of the stock and crypto market
- Fear-and-Greed index to further validate the strength of the breakout, if it happens
Complementing indicators for pattern confirmation
Till now, we have mostly focused on visual identification metrics. But other indicators can tell if the crypto or stock chart pattern is actually giving out the correct signal. These indicators offer additional evidence and reinforce the hypothesis corresponding to a bullish continuation:
Volume
To reiterate, different zones of the cup and handle pattern are supposed to show different volume metrics. The formation of the cup should be followed by dropping volumes. And when the handle pattern forms, the volume should go even lower before pushing out or surging to validate the price breakout.
Moving averages
A good way to validate the strength of a cup and handle formation is by closely examining the price levels related to key moving averages. This can help you gauge the overall market trend, only to tell if the pattern formation is going in the right direction or not. If you are viewing the pattern on a daily chart, make sure that as the cup and handle pattern forms, the price levels are always above the 50-day or the 200-day moving averages. A drop might invalidate the pattern formation.
Also, if you see a golden crossover occurring — a smaller moving average crossing above the higher moving average — it might validate the breakout potential of the cup and handle formation.
RSI (Relative Strength Index)
A bullish momentum in regards to the relative strength index is when the level is around 50. If you want to identify and validate a cup and handle crypto or stock chart pattern, ensure that the RSI is in the neutral zone of 50 or slightly less during the right side formation or even the handle formation. If the RSI quickly ends up moving to 70 or even 80 before the breakout even happens, the handle might see some more consolidation.
MACD (Moving Average Convergence Divergence)
We all want to see a bullish breakout. But there have been instances of false breakouts, trapping unwitting investors. In case you are concerned about the same in regards to the cup and handle formation, a MACD crossover — when the MACD line crosses above the signal line — is a good indication.
Now that we are all set with the indicators and validations, let’s try and trade the pattern.
Trading the cup and handle pattern
Before we actually look at the real asset examples, here are some theoretical trading patterns to make sure riding the cup and handle wave becomes easy:
Measuring the distance and potential profit target
The first thing that a trader should do, regardless of the bullish pattern, is determine the distance and the potential profit target. You can do this by identifying the resistance level of the cup and the bottom of the cup and measuring the distance between the two.
As this projection offers an approximate target, traders can enter the asset anywhere inside this trading range, provided other indicators validate the pattern formation.
Price breaks and breakout
In the end, it’s all about the breakout. And in the case of our pattern, it should happen after the handle-specific consolidation. The trick here is to keep an eye on the upper trendline (downward sloping) of the handle and keep validating the same with momentum or moving average-specific bullish indication.
Trading strategy and risk management
Now let us look at the trading module:
Entry points
More aggressive buyers can enter when the bottom of the cup is in — provided that the asset is holding strongly to the key support levels near the bottom. A good strategy here would be to check for a bullish RSI divergence or a golden crossover to ensure that the bottom is in and the cup will move to the right.
Risk-averse traders can enter once the asset breaks the resistance level of the cup. An increase in volume at this point can be a good indication. And finally, if your risk management game is solid, you might want to wait for a level retest after the breakout to get a clear confirmation.
Stop-loss placement
Like every other trade, you need to know where the stop-loss should be in case things go south. If you have a conservative approach towards trading, consider placing the stop-loss below the lower trendline of the cup’s handle. And if you are willing to take the risk in a more volatile space, you can place the same below the cup’s bottom.
Your focus should always be on restricting capital erosion. You should place the stop-loss accordingly.
Profit targets
It can be tempting to ride a bullish wave. However, the right point to exit by booking profits is crucial. You should measure the distance between the bottom and the resistance line to determine the right level. Once the breakout happens, it is ideal for projecting the same distance as the profit-taking target.
Do note that all these points, including the entry, profit target, and stop-loss, are based on general guidelines and aren’t absolute. You should do your due diligence before proceeding.
Many pro traders have much to say about the importance of an exit strategy.
“I know where I am getting out before I am getting in.”
Bruce Kovner, Founder: Caxton Associates (from “Market Wizards: Interviews with Top Traders, by Jack D.Schwager)
False breakouts and how to avoid them
Like any other bullish pattern, even a cup and handle formation can experience a false breakout. This way, the resistance can break from the handle, trapping investors before going back to the bottom of the cup or even lower. This is why entering after a retest becomes crucial.
Even though there is no guaranteed way to avoid false breakouts, you can focus on complementary indicators, clear price breaks, and price action monitoring to lower risk.
Real-life examples and instances
Let us now use everything we have on the cup and handle pattern to look at real-world examples from the crypto and stock markets.
Successful cup and handle pattern example trade in the stock market
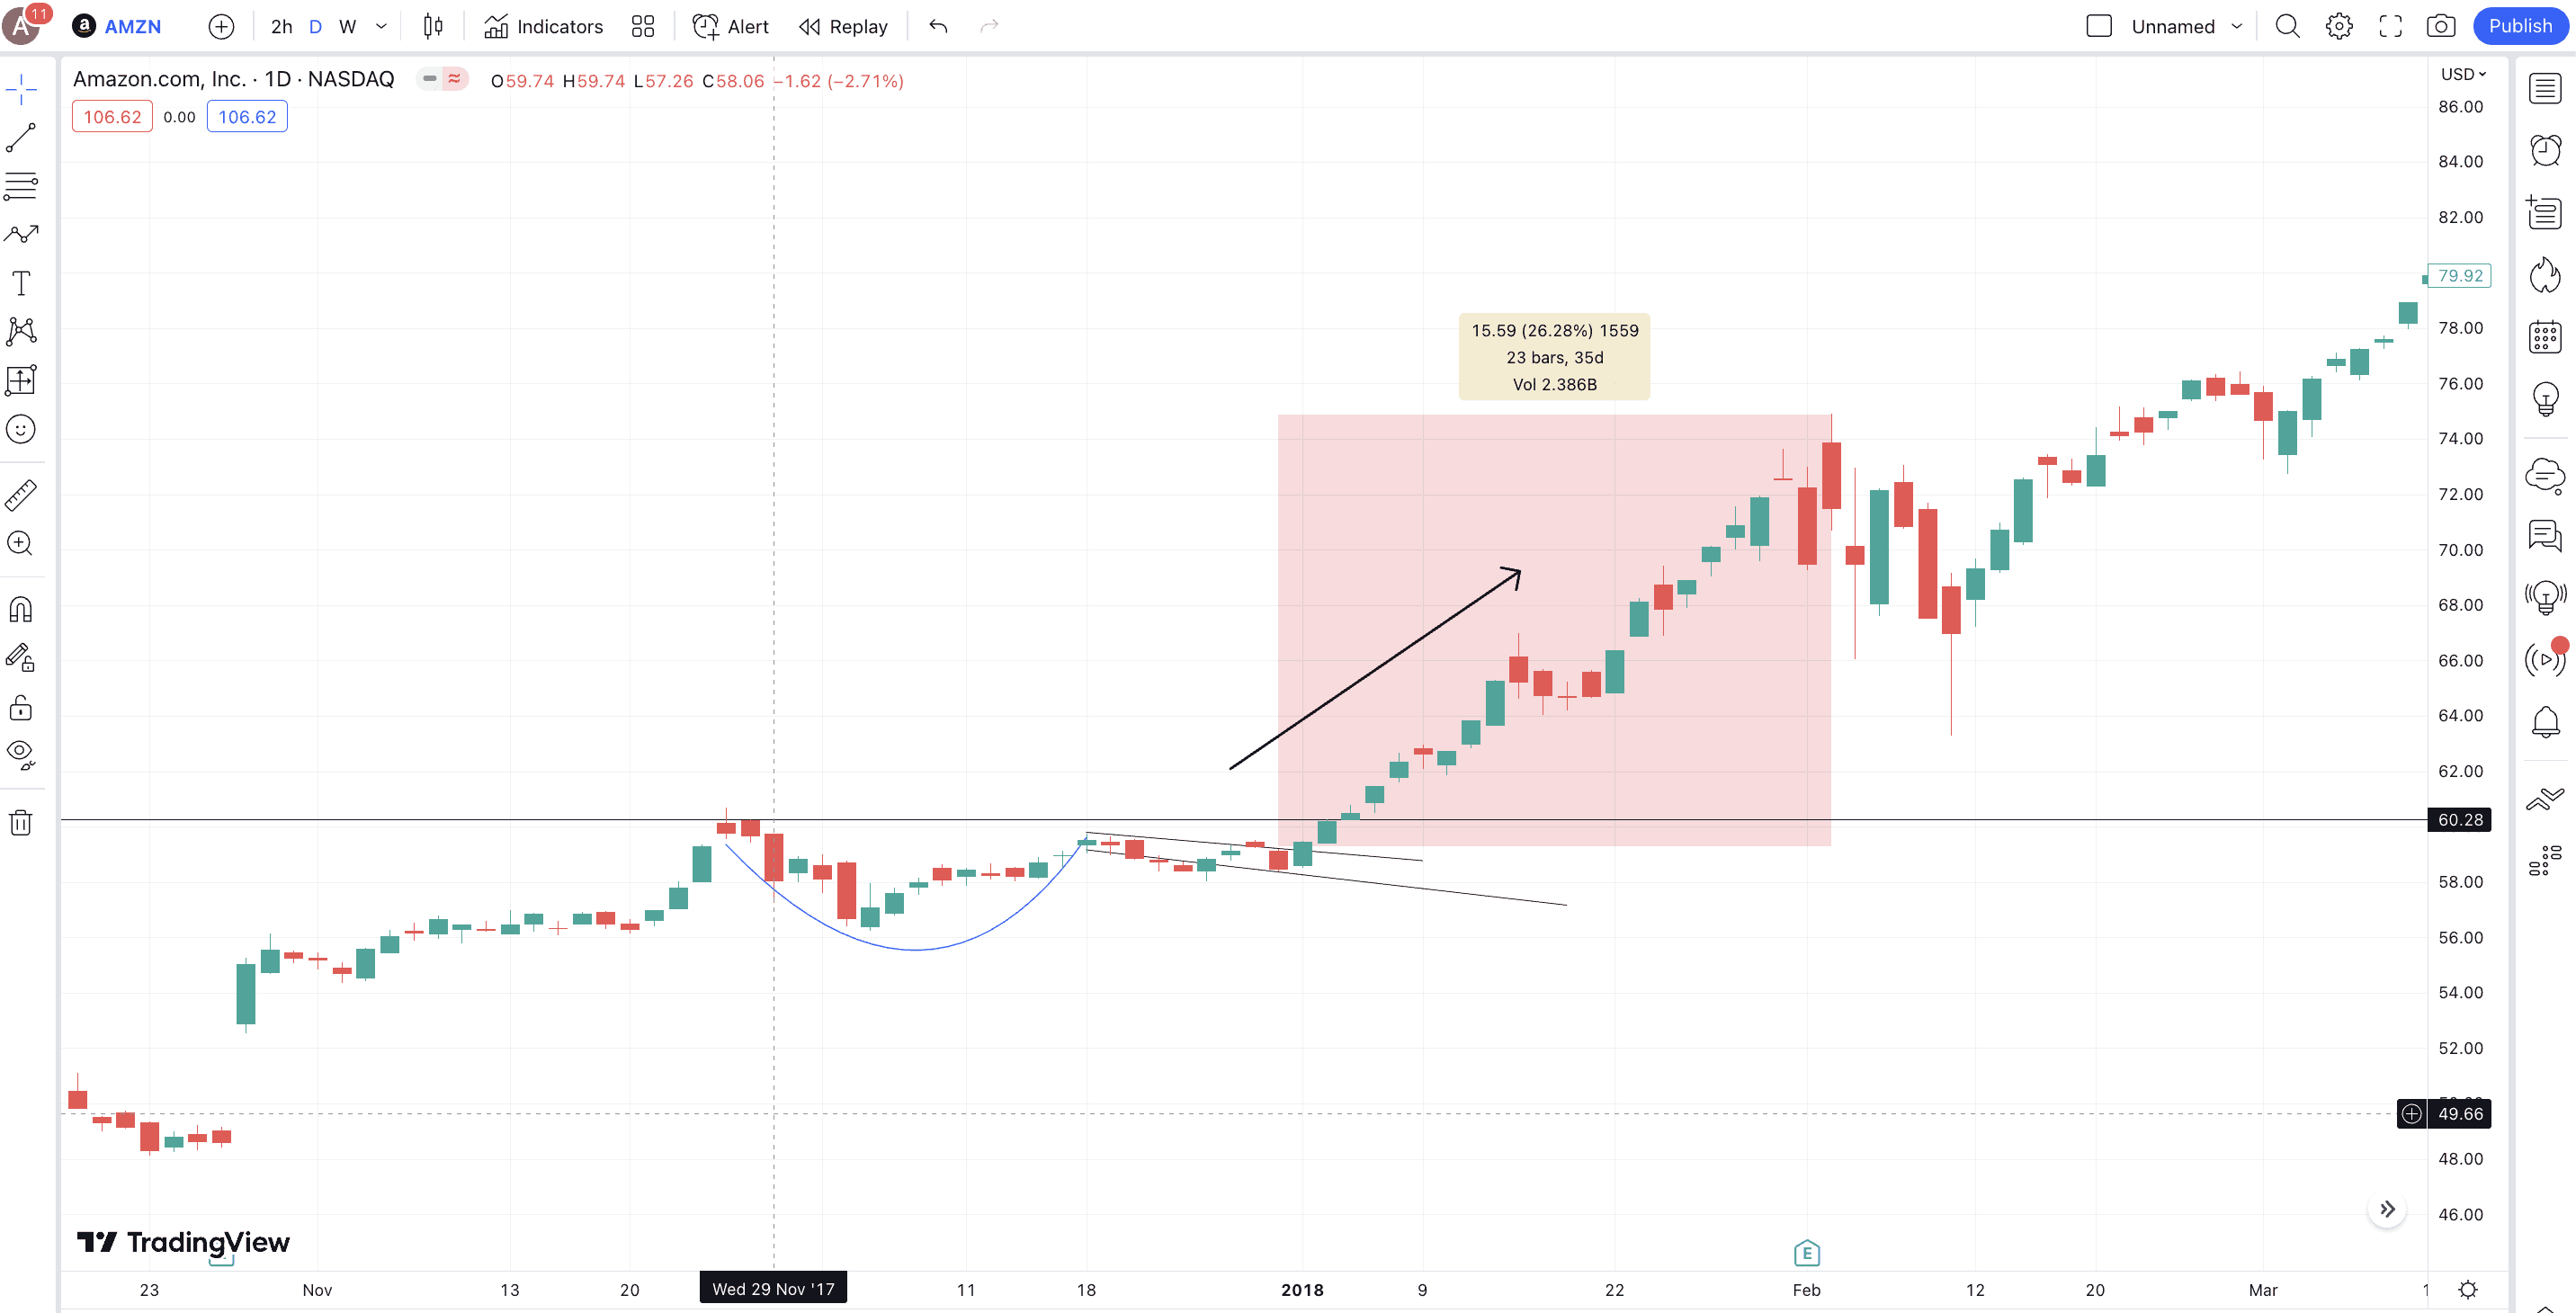
Below is Amazon’s (AMZN) chart between November 2017 to February 2018. Notice how the curved path showcases the formation of the cup, whereas the downward-sloping handle primes the stock for a breakout. Post the breakout, AMZN’s price surged almost 26% within 23 days.
Successful cup and handle pattern example trade in the cryptocurrency market
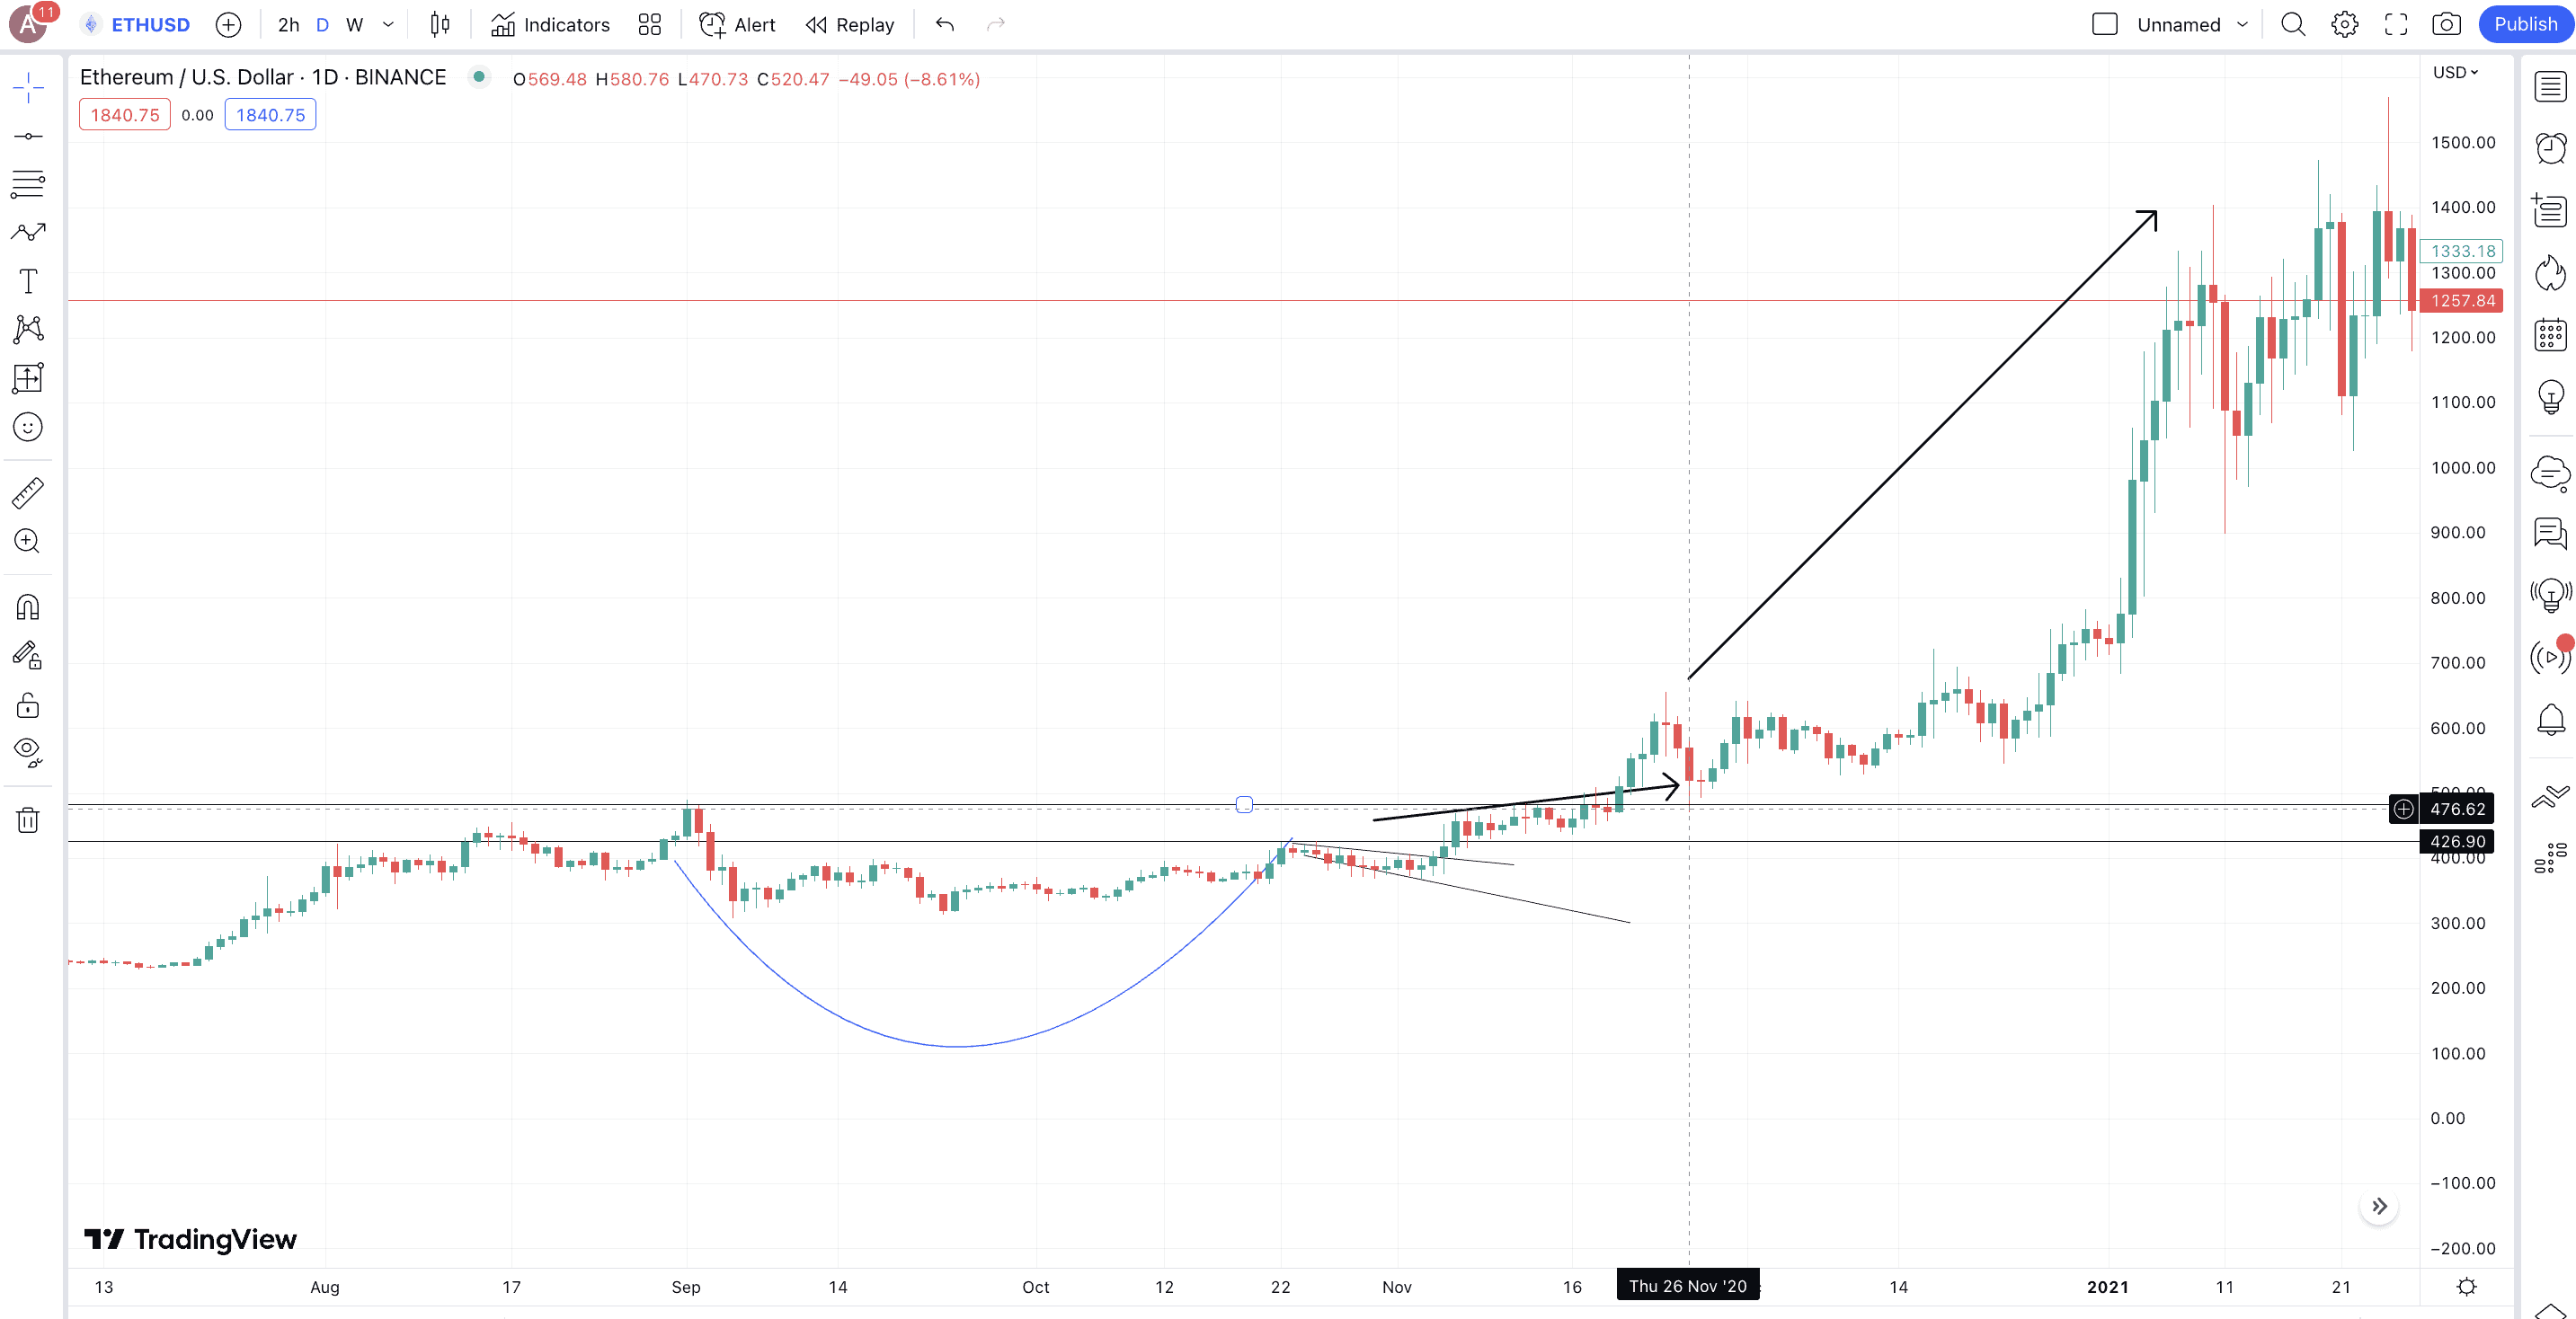
Here is ETH’s chart from late 2020, with the $483 level acting as a strong resistance for the drawn cup and handle pattern. The $427 level saw the handle forming. The handle breakout took some time, and there was a clear retest on Nov. 26, 2020. After the retest, ETH’s prices saw a massive surge, increasing to $2116 within a few months.
Analysis of failed cup and handle trades
Take the example of General Electric’s (GE) chart from 2016, with a clear cup and handle formation in effect. After breaking the resistance of $193.08, GE couldn’t soar higher and went down, marked by the arrow. It even fell lower than the bottom of the cup, hinting at a false breakout.
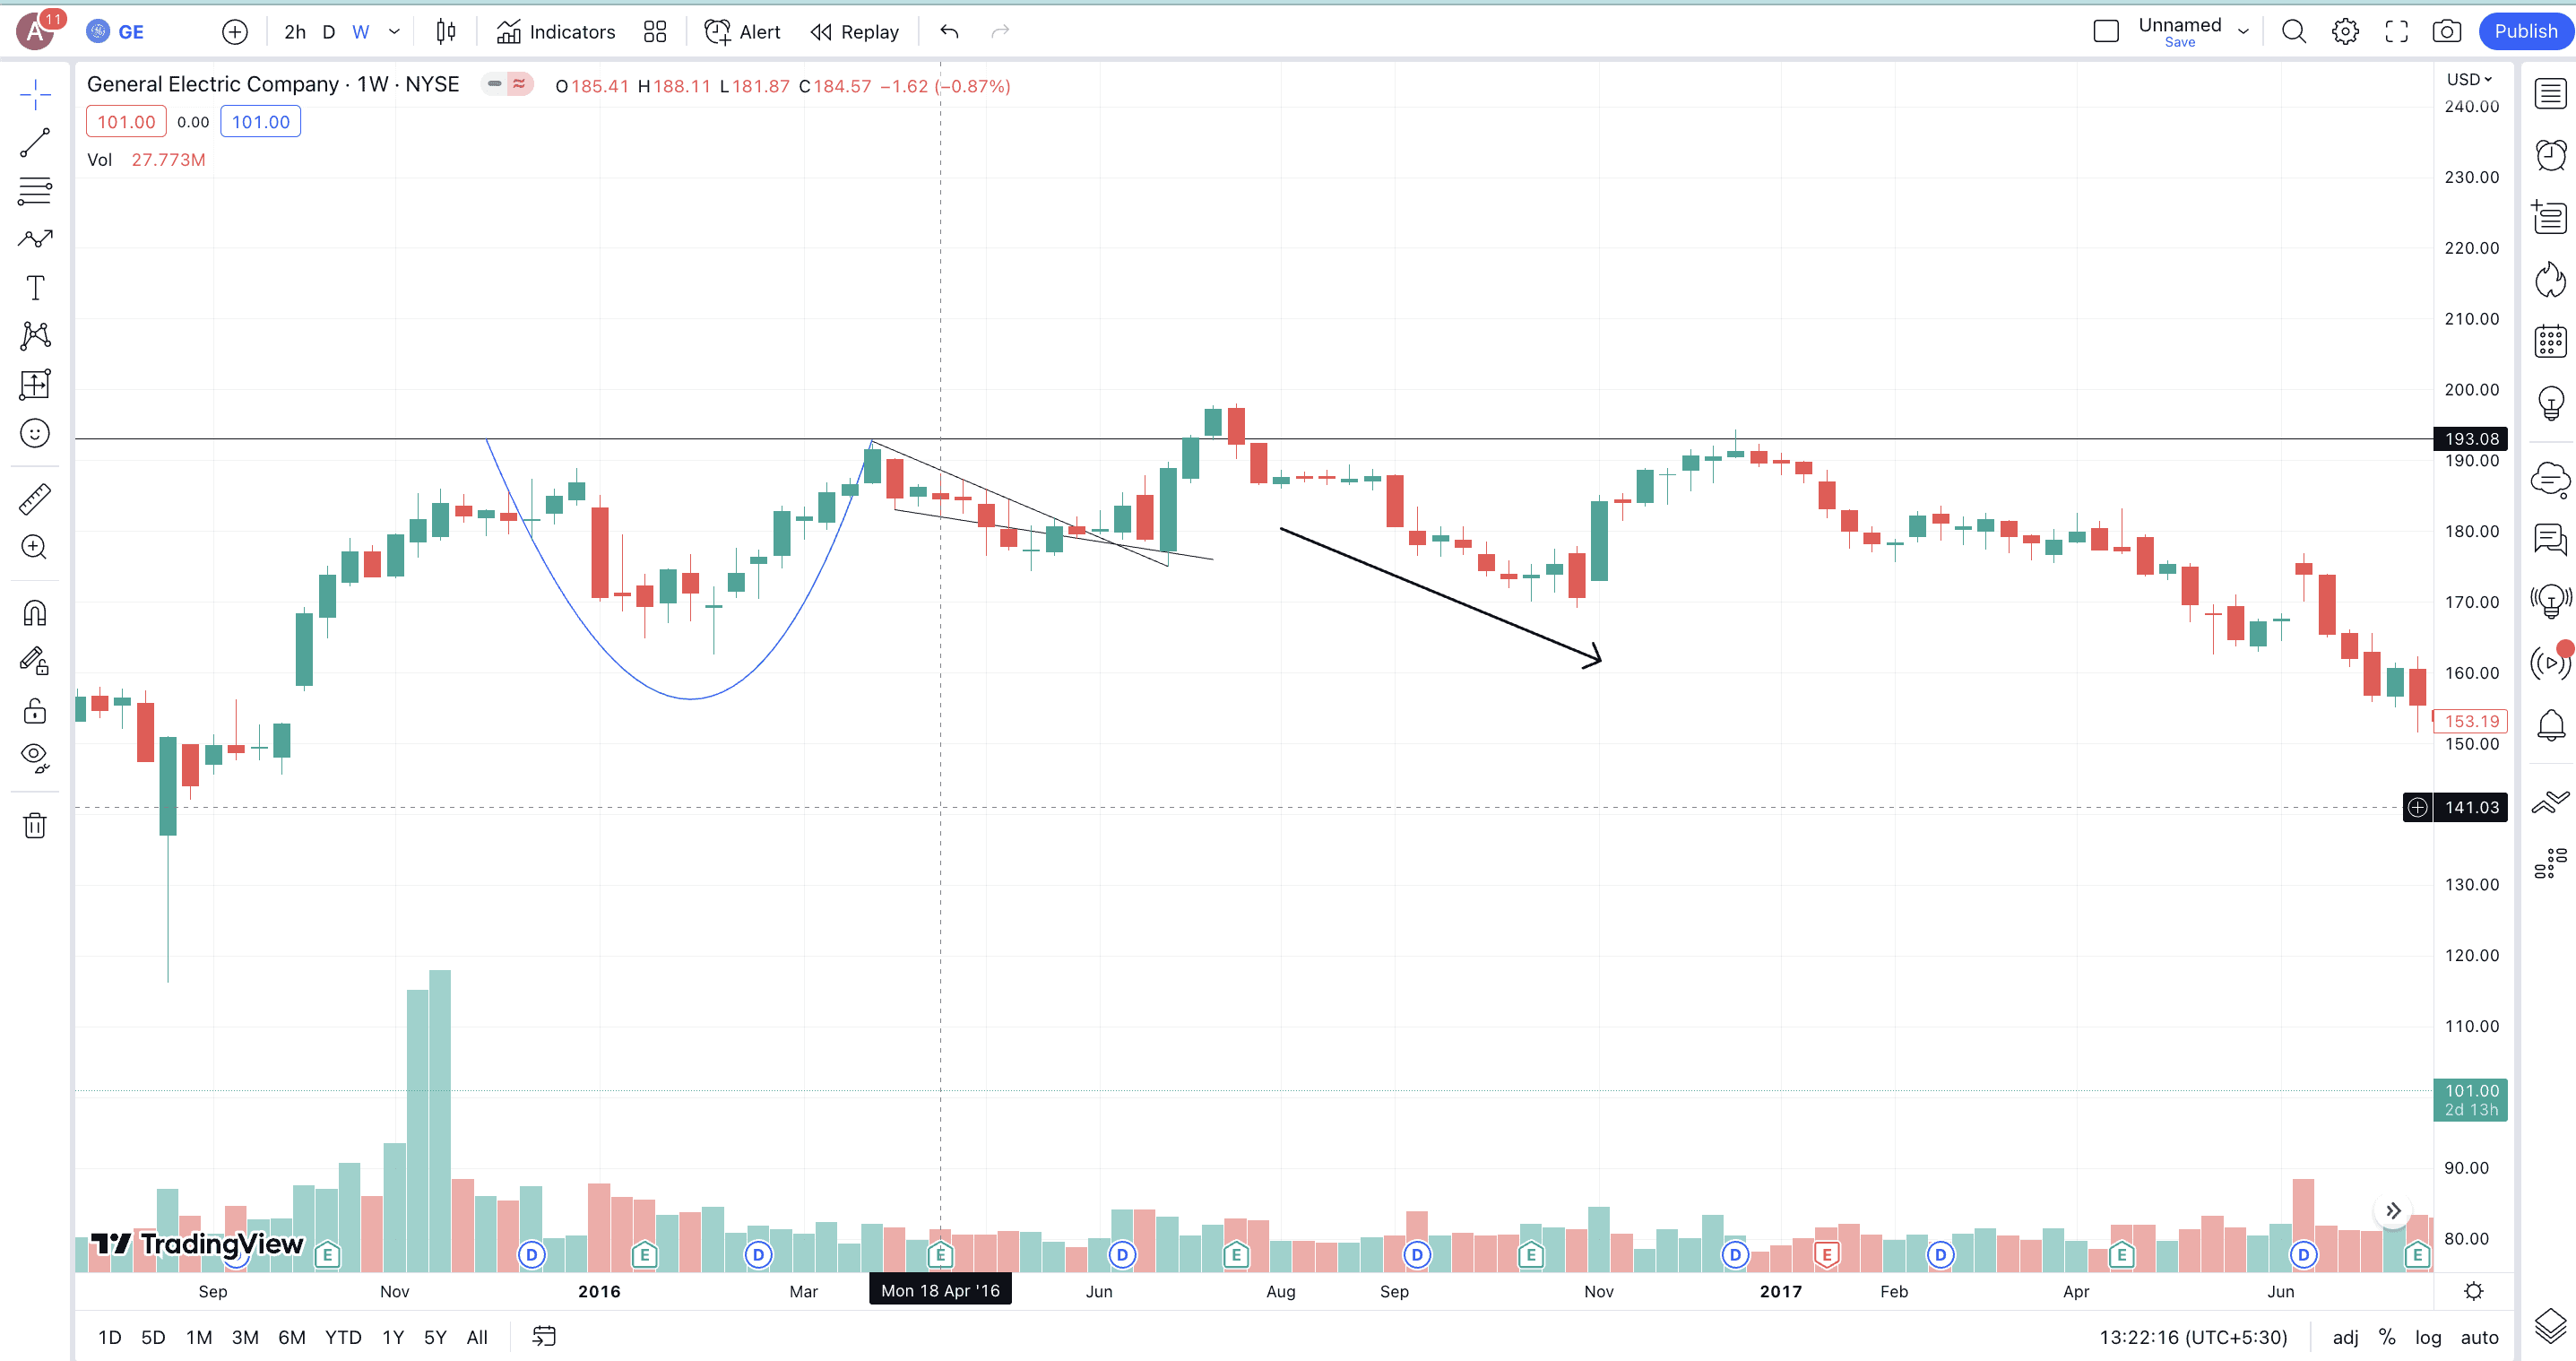
However, if you look at the volume chart, the resistance breakout wasn’t supported by an increase in volume — a probable reason for the pattern failure.
Advanced concepts for pro traders
The road to effective technical analysis doesn’t end with a cup and handle pattern. Pro traders should know that there can be some variations.
Variations of the cup and handle pattern
It is ideal for the pattern to have a bowl-shaped bottom and an even downward-sloping handle. Yet, in most cases, the chart formation might show a sharp “V” and a somewhat downward-sloping handle that is either a pennant or even a wedge. As long as the bottom forms at less than 50% of the previous uptrend and the handle doesn’t retrace over one-third in regards to the cup’s depth, you should be good to go.
The inverse cup and handle pattern
The cup and handle pattern is a bullish continuation pattern, but its inverse is also true. It feels like an inverted cup with an upward-sloping channel or wedge as the handle. In most cases, there is a breach of the support levels, making the inverse a bearing continuation pattern.
The role of market sentiment and external factors
Other factors might ensure that the breakout doesn’t happen immediately or fizzles out despite some good indicators. These include:
- Earnings reports that are mostly valid for stocks.
- Fear and Greed index for crypto as a lot of fear might keep buyers at bay.
- Geopolitical events
- Macroeconomic factors like interest rate hikes, infusing liquidity into the economy, and more.
An experience pro-trader should include these fundamental elements into the mix before going ahead with the analysis.
Combining the cup and handle pattern with other technical analysis tools
We did talk about a few indicators that can complement the price movement and price levels pertaining to the cup and handle formation. However, pro traders might choose to use a few more, such as:
Trendlines
While the cup and handles are pretty distinct entities, you can chart trendlines to locate other key levels within the trading range. That way, you can enter mid-way even if you miss the surge from the bottom.
Bollinger Bands
Crypto and the stock market can be volatile. However, pro traders can rely on Bollinger Bands and standard deviation to assess the volatility and breakout possibilities pertaining to a specific chart.
Fibonacci retracements
Pro traders can use fiber levels early on to place stop losses at specific levels. This approach is beneficial if you want to check where the handle can form without invalidating the bullish trend.
These pro-trading resources can make your analysis of the cup and handle pattern increasingly concrete.
The winner gets the cup and also the handle
The cup and handle pattern can be a winning technical analysis. It is based on well-defined psychology, doesn’t overwhelm the user, and comes with clearly segregated entry and exit points. Yet, using it isn’t without its share of flaws, including subjectivity, biased interpretations, chances of false breakouts, and overdependence on global aspects.
Despite all that, the Cup and Handle formation aligns perfectly with some of the other chart-specific indicators like moving averages, RSI, MACD, Bollinger Bands, and more — making it one of the more trusted tools in a trader’s arsenal.


